使用操作和快捷方式
本页介绍如何将物理键盘事件绑定到用户界面中的操作。例如,如果想在应用程序中定义键盘快捷方式,本页就是为你准备的。
概述
#对于 GUI 应用程序来说,要执行任何操作,它都必须有操作:用户希望告诉应用程序“做”某事。操作通常是直接执行操作的简单函数(例如设置值或保存文件)。然而,在大型应用程序中,事情更为复杂:调用操作的代码和操作本身的代码可能需要放在不同的地方。快捷方式(按键绑定)可能需要在完全不知道它们所调用的操作的级别上定义。
这就是 Flutter 的操作和快捷方式系统的用武之地。它允许开发者定义实现与其绑定的意图的操作。在此上下文中,意图是用户希望执行的通用操作,而 Intent 类实例在 Flutter 中表示这些用户意图。一个 Intent 可以是通用的,在不同的上下文中由不同的操作实现。Action 可以是一个简单的回调(如 CallbackAction 的情况),也可以是更复杂的东西,它与整个撤销/重做架构(例如)或其他逻辑集成。
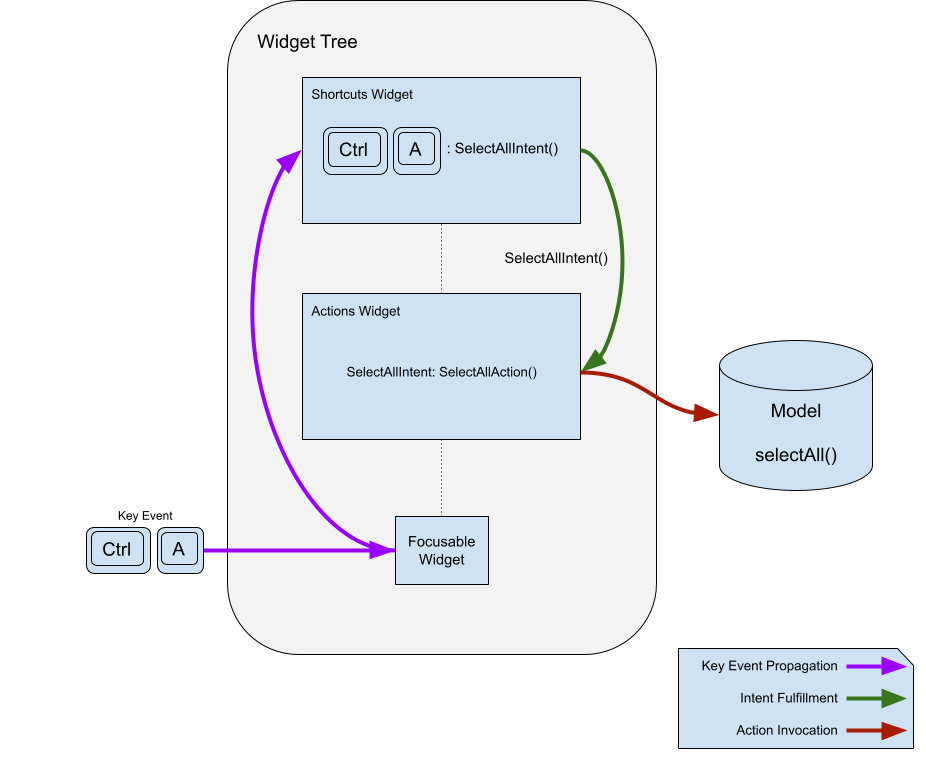
Shortcuts 是通过按下键或组合键激活的按键绑定。按键组合及其绑定的意图存储在一个表中。当 Shortcuts 小部件调用它们时,它会将匹配的意图发送到操作子系统进行实现。
为了说明操作和快捷方式中的概念,本文将创建一个简单的应用程序,允许用户使用按钮和快捷方式在文本字段中选择和复制文本。
为什么要将操作与意图分离?
#你可能会想:为什么不直接将按键组合映射到操作呢?为什么还要用意图呢?这是因为将按键映射定义(通常在高级别)与操作定义(通常在低级别)分离是有用的,而且重要的是,能够将单个按键组合映射到应用程序中的预期操作,并让它自动适应针对所聚焦上下文实现该预期操作的任何操作。
例如,Flutter 有一个 ActivateIntent 小部件,它将每种类型的控件映射到其相应的 ActivateAction 版本(并执行激活控件的代码)。此代码通常需要相当私有的访问权限才能完成其工作。如果 Intent 提供的额外间接层不存在,则需要将操作的定义提升到 Shortcuts 小部件的定义实例可以看到它们的位置,导致快捷方式对要调用的操作了解得比必要的多,并且拥有或提供它原本不需要的状态。这允许你的代码将两个关注点分离,使其更加独立。
意图配置一个操作,以便同一个操作可以用于多种用途。一个例子是 DirectionalFocusIntent,它接受一个移动焦点的方向,允许 DirectionalFocusAction 知道要移动焦点的方向。但要小心:不要在 Intent 中传递适用于 Action 的所有调用的状态:这种状态应该传递给 Action 本身的构造函数,以避免 Intent 需要了解太多。
为什么不使用回调?
#你可能还会想:为什么不直接使用回调而不是 Action 对象呢?主要原因是,操作通过实现 isEnabled 来决定它们是否启用是很有用的。此外,如果按键绑定和这些绑定的实现位于不同的位置,通常会很有帮助。
如果你只需要回调,而不需要 Actions 和 Shortcuts 的灵活性,你可以使用 CallbackShortcuts 小部件。
@override
Widget build(BuildContext context) {
  return CallbackShortcuts(
    bindings: <ShortcutActivator, VoidCallback>{
      const SingleActivator(LogicalKeyboardKey.arrowUp): () {
        setState(() => count = count + 1);
      },
      const SingleActivator(LogicalKeyboardKey.arrowDown): () {
        setState(() => count = count - 1);
      },
    },
    child: Focus(
      autofocus: true,
      child: Column(
        children: <Widget>[
          const Text('Press the up arrow key to add to the counter'),
          const Text('Press the down arrow key to subtract from the counter'),
          Text('count: $count'),
        ],
      ),
    ),
  );
}
快捷方式
#正如你将在下面看到的,操作本身很有用,但最常见的用例是将其绑定到键盘快捷方式。这就是 Shortcuts 小部件的用途。
它被插入到小部件层次结构中,以定义当按下某个键组合时表示用户意图的键组合。为了将键组合的预期目的转换为具体操作,Actions 小部件用于将 Intent 映射到 Action。例如,你可以定义一个 SelectAllIntent,并将其绑定到你自己的 SelectAllAction 或 CanvasSelectAllAction,通过一个键绑定,系统将根据你的应用程序的哪一部分获得焦点来调用其中一个。让我们看看键绑定部分是如何工作的。
@override
Widget build(BuildContext context) {
  return Shortcuts(
    shortcuts: <LogicalKeySet, Intent>{
      LogicalKeySet(LogicalKeyboardKey.control, LogicalKeyboardKey.keyA):
          const SelectAllIntent(),
    },
    child: Actions(
      dispatcher: LoggingActionDispatcher(),
      actions: <Type, Action<Intent>>{
        SelectAllIntent: SelectAllAction(model),
      },
      child: Builder(
        builder: (context) => TextButton(
          onPressed: Actions.handler<SelectAllIntent>(
            context,
            const SelectAllIntent(),
          ),
          child: const Text('SELECT ALL'),
        ),
      ),
    ),
  );
}
提供给 Shortcuts 小部件的映射将 LogicalKeySet(或 ShortcutActivator,请参见下面的注释)映射到 Intent 实例。逻辑键集定义了一组一个或多个键,意图指示按键的预期目的。Shortcuts 小部件在映射中查找按键,以找到一个 Intent 实例,然后将其提供给操作的 invoke() 方法。
ShortcutManager
#快捷方式管理器是一个比 Shortcuts 小部件生命周期更长的对象,它在收到按键事件时将其传递下去。它包含决定如何处理按键的逻辑、遍历树以查找其他快捷方式映射的逻辑,并维护一个按键组合到意图的映射。
虽然 ShortcutManager 的默认行为通常是可取的,但 Shortcuts 小部件接受一个你可以子类化以自定义其功能的 ShortcutManager。
例如,如果你想记录 Shortcuts 小部件处理的每个按键,你可以创建一个 LoggingShortcutManager。
class LoggingShortcutManager extends ShortcutManager {
  @override
  KeyEventResult handleKeypress(BuildContext context, KeyEvent event) {
    final KeyEventResult result = super.handleKeypress(context, event);
    if (result == KeyEventResult.handled) {
      print('Handled shortcut $event in $context');
    }
    return result;
  }
}
现在,每当 Shortcuts 小部件处理一个快捷方式时,它都会打印出按键事件和相关上下文。
动作
#Actions 允许定义应用程序可以通过使用 Intent 调用它们来执行的操作。操作可以启用或禁用,并接收调用它们的意图实例作为参数,以允许意图进行配置。
定义操作
#最简单的操作只是 Action<Intent> 的子类,带有一个 invoke() 方法。这是一个简单的操作,它只是在提供的模型上调用一个函数。
class SelectAllAction extends Action<SelectAllIntent> {
  SelectAllAction(this.model);

  final Model model;

  @override
  void invoke(covariant SelectAllIntent intent) => model.selectAll();
}
或者,如果创建新类太麻烦,可以使用 CallbackAction。
CallbackAction(onInvoke: (intent) => model.selectAll());一旦你有了操作,就可以使用 Actions 小部件将其添加到你的应用程序中,该小部件接受一个从 Intent 类型到 Action 的映射。
@override
Widget build(BuildContext context) {
  return Actions(
    actions: <Type, Action<Intent>>{SelectAllIntent: SelectAllAction(model)},
    child: child,
  );
}
Shortcuts 小部件使用 Focus 小部件的上下文和 Actions.invoke 来查找要调用的操作。如果 Shortcuts 小部件在遇到的第一个 Actions 小部件中没有找到匹配的意图类型,它会考虑下一个祖先 Actions 小部件,依此类推,直到它到达小部件树的根部,或者找到匹配的意图类型并调用相应的操作。
调用操作
#操作系统有几种调用操作的方法。迄今为止最常见的方法是使用上一节中介绍的 Shortcuts 小部件,但还有其他方法可以查询操作子系统并调用操作。可以调用未绑定到键的操作。
例如,要查找与意图关联的操作,你可以使用
Action<SelectAllIntent>? selectAll = Actions.maybeFind<SelectAllIntent>(
  context,
);
如果给定 context 中存在与 SelectAllIntent 类型关联的 Action,则此方法返回该 Action。如果不存在,则返回 null。如果关联的 Action 应该始终存在,则使用 find 而不是 maybeFind,后者在未找到匹配的 Intent 类型时会抛出异常。
要调用操作(如果存在),请调用
Object? result;
if (selectAll != null) {
  result = Actions.of(
    context,
  ).invokeAction(selectAll, const SelectAllIntent());
}
将其合并到一个调用中,如下所示:
Object? result = Actions.maybeInvoke<SelectAllIntent>(
  context,
  const SelectAllIntent(),
);
有时,你希望通过按下按钮或其他控件来调用操作。你可以使用 Actions.handler 函数来完成此操作。如果意图映射到启用的操作,则 Actions.handler 函数会创建一个处理程序闭包。但是,如果没有映射,则返回 null。这允许在上下文中没有匹配的启用操作时禁用按钮。
@override
Widget build(BuildContext context) {
  return Actions(
    actions: <Type, Action<Intent>>{SelectAllIntent: SelectAllAction(model)},
    child: Builder(
      builder: (context) => TextButton(
        onPressed: Actions.handler<SelectAllIntent>(
          context,
          SelectAllIntent(controller: controller),
        ),
        child: const Text('SELECT ALL'),
      ),
    ),
  );
}
Actions 小部件仅在 isEnabled(Intent intent) 返回 true 时调用操作,这允许操作决定分发器是否应考虑调用它。如果操作未启用,则 Actions 小部件会给小部件层次结构中更高层级的另一个启用操作(如果存在)执行的机会。
前面的示例使用了 Builder,因为 Actions.handler 和 Actions.invoke(例如)只在提供的 context 中查找操作,如果示例传递了提供给 build 函数的 context,框架将开始在当前小部件“之上”查找。使用 Builder 允许框架在相同的 build 函数中找到定义的操作。
你可以在不需要 BuildContext 的情况下调用操作,但由于 Actions 小部件需要上下文才能找到要调用的启用操作,因此你需要提供一个上下文,可以通过创建自己的 Action 实例,或使用 Actions.find 在适当的上下文中找到一个。
要调用操作,请将操作传递给 ActionDispatcher 上的 invoke 方法,无论是你自己创建的,还是使用 Actions.of(context) 方法从现有 Actions 小部件检索的。在调用 invoke 之前,请检查操作是否已启用。当然,你也可以直接在操作本身上调用 invoke,传入一个 Intent,但这样你就放弃了操作分发器可能提供的任何服务(例如日志记录、撤销/重做等)。
操作分发器
#大多数时候,你只想调用一个操作,让它完成它的工作,然后就忘了它。但是,有时你可能想记录已执行的操作。
这就是用自定义分发器替换默认 ActionDispatcher 的地方。你将 ActionDispatcher 传递给 Actions 小部件,它会从该小部件下方未设置自己的分发器的任何 Actions 小部件中调用操作。
Actions 在调用操作时所做的第一件事是查找 ActionDispatcher 并将操作传递给它进行调用。如果不存在,它会创建一个默认的 ActionDispatcher,该分发器只会调用操作。
但是,如果你想记录所有被调用的操作,你可以创建自己的 LoggingActionDispatcher 来完成这项工作。
class LoggingActionDispatcher extends ActionDispatcher {
  @override
  Object? invokeAction(
    covariant Action<Intent> action,
    covariant Intent intent, [
    BuildContext? context,
  ]) {
    print('Action invoked: $action($intent) from $context');
    super.invokeAction(action, intent, context);

    return null;
  }

  @override
  (bool, Object?) invokeActionIfEnabled(
    covariant Action<Intent> action,
    covariant Intent intent, [
    BuildContext? context,
  ]) {
    print('Action invoked: $action($intent) from $context');
    return super.invokeActionIfEnabled(action, intent, context);
  }
}
然后你把它传递给你的顶层 Actions 小部件。
@override
Widget build(BuildContext context) {
  return Actions(
    dispatcher: LoggingActionDispatcher(),
    actions: <Type, Action<Intent>>{SelectAllIntent: SelectAllAction(model)},
    child: Builder(
      builder: (context) => TextButton(
        onPressed: Actions.handler<SelectAllIntent>(
          context,
          const SelectAllIntent(),
        ),
        child: const Text('SELECT ALL'),
      ),
    ),
  );
}
这将在每次执行操作时记录下来,如下所示:
flutter: Action invoked: SelectAllAction#906fc(SelectAllIntent#a98e3) from Builder(dependencies: _[ActionsMarker])整合起来
#Actions 和 Shortcuts 的组合功能强大:你可以定义通用意图,这些意图在小部件级别映射到特定操作。这是一个简单的应用程序,说明了上述概念。该应用程序创建了一个文本字段,旁边还有“全选”和“复制到剪贴板”按钮。按钮调用操作来完成其工作。所有调用的操作和快捷方式都已记录。
import 'package:flutter/material.dart';
import 'package:flutter/services.dart';

/// A text field that also has buttons to select all the text and copy the
/// selected text to the clipboard.
class CopyableTextField extends StatefulWidget {
  const CopyableTextField({super.key, required this.title});

  final String title;

  @override
  State<CopyableTextField> createState() => _CopyableTextFieldState();
}

class _CopyableTextFieldState extends State<CopyableTextField> {
  late final TextEditingController controller = TextEditingController();

  @override
  void dispose() {
    controller.dispose();
    super.dispose();
  }

  @override
  Widget build(BuildContext context) {
    return Actions(
      dispatcher: LoggingActionDispatcher(),
      actions: <Type, Action<Intent>>{
        ClearIntent: ClearAction(controller),
        CopyIntent: CopyAction(controller),
        SelectAllIntent: SelectAllAction(controller),
      },
      child: Builder(
        builder: (context) {
          return Scaffold(
            body: Center(
              child: Row(
                children: <Widget>[
                  const Spacer(),
                  Expanded(child: TextField(controller: controller)),
                  IconButton(
                    icon: const Icon(Icons.copy),
                    onPressed: Actions.handler<CopyIntent>(
                      context,
                      const CopyIntent(),
                    ),
                  ),
                  IconButton(
                    icon: const Icon(Icons.select_all),
                    onPressed: Actions.handler<SelectAllIntent>(
                      context,
                      const SelectAllIntent(),
                    ),
                  ),
                  const Spacer(),
                ],
              ),
            ),
          );
        },
      ),
    );
  }
}

/// A ShortcutManager that logs all keys that it handles.
class LoggingShortcutManager extends ShortcutManager {
  @override
  KeyEventResult handleKeypress(BuildContext context, KeyEvent event) {
    final KeyEventResult result = super.handleKeypress(context, event);
    if (result == KeyEventResult.handled) {
      print('Handled shortcut $event in $context');
    }
    return result;
  }
}

/// An ActionDispatcher that logs all the actions that it invokes.
class LoggingActionDispatcher extends ActionDispatcher {
  @override
  Object? invokeAction(
    covariant Action<Intent> action,
    covariant Intent intent, [
    BuildContext? context,
  ]) {
    print('Action invoked: $action($intent) from $context');
    super.invokeAction(action, intent, context);

    return null;
  }
}

/// An intent that is bound to ClearAction in order to clear its
/// TextEditingController.
class ClearIntent extends Intent {
  const ClearIntent();
}

/// An action that is bound to ClearIntent that clears its
/// TextEditingController.
class ClearAction extends Action<ClearIntent> {
  ClearAction(this.controller);

  final TextEditingController controller;

  @override
  Object? invoke(covariant ClearIntent intent) {
    controller.clear();

    return null;
  }
}

/// An intent that is bound to CopyAction to copy from its
/// TextEditingController.
class CopyIntent extends Intent {
  const CopyIntent();
}

/// An action that is bound to CopyIntent that copies the text in its
/// TextEditingController to the clipboard.
class CopyAction extends Action<CopyIntent> {
  CopyAction(this.controller);

  final TextEditingController controller;

  @override
  Object? invoke(covariant CopyIntent intent) {
    final String selectedString = controller.text.substring(
      controller.selection.baseOffset,
      controller.selection.extentOffset,
    );
    Clipboard.setData(ClipboardData(text: selectedString));

    return null;
  }
}

/// An intent that is bound to SelectAllAction to select all the text in its
/// controller.
class SelectAllIntent extends Intent {
  const SelectAllIntent();
}

/// An action that is bound to SelectAllAction that selects all text in its
/// TextEditingController.
class SelectAllAction extends Action<SelectAllIntent> {
  SelectAllAction(this.controller);

  final TextEditingController controller;

  @override
  Object? invoke(covariant SelectAllIntent intent) {
    controller.selection = controller.selection.copyWith(
      baseOffset: 0,
      extentOffset: controller.text.length,
      affinity: controller.selection.affinity,
    );

    return null;
  }
}

/// The top level application class.
///
/// Shortcuts defined here are in effect for the whole app,
/// although different widgets may fulfill them differently.
class MyApp extends StatelessWidget {
  const MyApp({super.key});

  static const String title = 'Shortcuts and Actions Demo';

  @override
  Widget build(BuildContext context) {
    return MaterialApp(
      title: title,
      theme: ThemeData(
        colorScheme: ColorScheme.fromSeed(seedColor: Colors.deepPurple),
      ),
      home: Shortcuts(
        shortcuts: <LogicalKeySet, Intent>{
          LogicalKeySet(LogicalKeyboardKey.escape): const ClearIntent(),
          LogicalKeySet(LogicalKeyboardKey.control, LogicalKeyboardKey.keyC):
              const CopyIntent(),
          LogicalKeySet(LogicalKeyboardKey.control, LogicalKeyboardKey.keyA):
              const SelectAllIntent(),
        },
        child: const CopyableTextField(title: title),
      ),
    );
  }
}

void main() => runApp(const MyApp());