动画教程
本教程向您展示如何在 Flutter 中构建显式动画。这些示例相互借鉴,向您介绍了动画库的不同方面。本教程基于动画库中的基本概念、类和方法构建,您可以在动画简介中了解它们。
Flutter SDK 还提供了内置的显式动画,例如FadeTransition、SizeTransition 和SlideTransition。这些简单的动画通过设置起点和终点来触发。它们比此处描述的自定义显式动画更容易实现。
以下部分将引导您完成几个动画示例。每个部分都提供了该示例的源代码链接。
渲染动画
#到目前为止,您已经学会了如何随时间生成一系列数字。屏幕上还没有渲染任何内容。要使用 Animation 对象进行渲染,请将 Animation 对象存储为小部件的成员,然后使用其值来决定如何绘制。
考虑以下不带动画绘制 Flutter 标志的应用程序
import 'package:flutter/material.dart';

void main() => runApp(const LogoApp());

class LogoApp extends StatefulWidget {
  const LogoApp({super.key});

  @override
  State<LogoApp> createState() => _LogoAppState();
}

class _LogoAppState extends State<LogoApp> {
  @override
  Widget build(BuildContext context) {
    return Center(
      child: Container(
        margin: const EdgeInsets.symmetric(vertical: 10),
        height: 300,
        width: 300,
        child: const FlutterLogo(),
      ),
    );
  }
}
应用源代码: animate0
以下显示了修改后的相同代码,以动画方式使标志从无到完全大小增长。定义 AnimationController 时,必须传入 vsync 对象。vsync 参数在AnimationController 部分中描述。
非动画示例中的更改已突出显示
class _LogoAppState extends State<LogoApp> {
class _LogoAppState extends State<LogoApp> with SingleTickerProviderStateMixin {
  late Animation<double> animation;
  late AnimationController controller;

  @override
  void initState() {
    super.initState();
    controller =
        AnimationController(duration: const Duration(seconds: 2), vsync: this);
    animation = Tween<double>(begin: 0, end: 300).animate(controller)
      ..addListener(() {
        setState(() {
          // The state that has changed here is the animation object's value.
        });
      });
    controller.forward();
  }

  @override
  Widget build(BuildContext context) {
    return Center(
      child: Container(
        margin: const EdgeInsets.symmetric(vertical: 10),
        height: 300,
        width: 300,
        height: animation.value,
        width: animation.value,
        child: const FlutterLogo(),
      ),
    );
  }

  @override
  void dispose() {
    controller.dispose();
    super.dispose();
  }
}
应用源代码: animate1
addListener() 函数调用 setState(),因此每次 Animation 生成新数字时,当前帧都会被标记为脏,这会强制再次调用 build()。在 build() 中,容器会改变大小,因为其高度和宽度现在使用 animation.value 而不是硬编码值。在 State 对象被丢弃时处置控制器以防止内存泄漏。
通过这些微小的更改,您已经在 Flutter 中创建了您的第一个动画!
使用 AnimatedWidget 简化
#AnimatedWidget 基类允许您将核心小部件代码与动画代码分离。AnimatedWidget 不需要维护 State 对象来保存动画。添加以下 AnimatedLogo 类
class AnimatedLogo extends AnimatedWidget {
  const AnimatedLogo({super.key, required Animation<double> animation})
    : super(listenable: animation);

  @override
  Widget build(BuildContext context) {
    final animation = listenable as Animation<double>;
    return Center(
      child: Container(
        margin: const EdgeInsets.symmetric(vertical: 10),
        height: animation.value,
        width: animation.value,
        child: const FlutterLogo(),
      ),
    );
  }
}
AnimatedLogo 在绘制自身时使用 animation 的当前值。
LogoApp 仍然管理 AnimationController 和 Tween,并将 Animation 对象传递给 AnimatedLogo
void main() => runApp(const LogoApp());

class AnimatedLogo extends AnimatedWidget {
  const AnimatedLogo({super.key, required Animation<double> animation})
      : super(listenable: animation);

  @override
  Widget build(BuildContext context) {
    final animation = listenable as Animation<double>;
    return Center(
      child: Container(
        margin: const EdgeInsets.symmetric(vertical: 10),
        height: animation.value,
        width: animation.value,
        child: const FlutterLogo(),
      ),
    );
  }
}

class LogoApp extends StatefulWidget {
  // ...

  @override
  void initState() {
    super.initState();
    controller =
        AnimationController(duration: const Duration(seconds: 2), vsync: this);
    animation = Tween<double>(begin: 0, end: 300).animate(controller)
      ..addListener(() {
        setState(() {
          // The state that has changed here is the animation object's value.
        });
      });
    animation = Tween<double>(begin: 0, end: 300).animate(controller);
    controller.forward();
  }

  @override
  Widget build(BuildContext context) {
    return Center(
      child: Container(
        margin: const EdgeInsets.symmetric(vertical: 10),
        height: animation.value,
        width: animation.value,
        child: const FlutterLogo(),
      ),
    );
  }
  Widget build(BuildContext context) => AnimatedLogo(animation: animation);

  // ...
}
应用源代码: animate2
监控动画进度
#了解动画何时改变状态(例如完成、向前移动或反转)通常很有帮助。您可以使用 addStatusListener() 获取此通知。以下代码修改了前面的示例,使其侦听状态更改并打印更新。突出显示的行显示了更改
class _LogoAppState extends State<LogoApp> with SingleTickerProviderStateMixin {
  late Animation<double> animation;
  late AnimationController controller;

  @override
  void initState() {
    super.initState();
    controller = AnimationController(
      duration: const Duration(seconds: 2),
      vsync: this,
    );
    animation = Tween<double>(begin: 0, end: 300).animate(controller)
      ..addStatusListener((status) => print('$status'));
    controller.forward();
  }
  // ...
}
运行此代码会产生以下输出
AnimationStatus.forward
AnimationStatus.completed
接下来,使用 addStatusListener() 在开头或结尾反转动画。这会创建一种“呼吸”效果
void initState() {
  super.initState();
  controller =
      AnimationController(duration: const Duration(seconds: 2), vsync: this);
  animation = Tween<double>(begin: 0, end: 300).animate(controller);
  animation = Tween<double>(begin: 0, end: 300).animate(controller)
    ..addStatusListener((status) {
      if (status == AnimationStatus.completed) {
        controller.reverse();
      } else if (status == AnimationStatus.dismissed) {
        controller.forward();
      }
    })
    ..addStatusListener((status) => print('$status'));
  controller.forward();
}
应用源代码: animate3
使用 AnimatedBuilder 重构
#animate3 示例中的代码存在一个问题,即更改动画需要更改渲染标志的小部件。一个更好的解决方案是将职责分离到不同的类中
- 渲染标志
- 定义
Animation对象 - 渲染过渡
您可以使用 AnimatedBuilder 类来实现这种分离。AnimatedBuilder 是渲染树中的一个独立类。与 AnimatedWidget 一样,AnimatedBuilder 自动监听 Animation 对象的通知,并在必要时将小部件树标记为脏,因此您无需调用 addListener()。
animate4 示例的小部件树如下所示
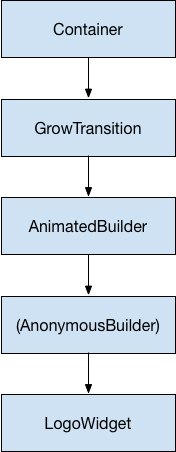
从小部件树的底部开始,渲染标志的代码很简单
class LogoWidget extends StatelessWidget {
  const LogoWidget({super.key});

  // Leave out the height and width so it fills the animating parent.
  @override
  Widget build(BuildContext context) {
    return Container(
      margin: const EdgeInsets.symmetric(vertical: 10),
      child: const FlutterLogo(),
    );
  }
}
图中中间的三个块都是在 GrowTransition 的 build() 方法中创建的,如下所示。GrowTransition 小部件本身是无状态的,并保存了定义过渡动画所需的最终变量集。build() 函数创建并返回 AnimatedBuilder,它将(匿名构建器)方法和 LogoWidget 对象作为参数。渲染过渡的工作实际上发生在(匿名构建器)方法中,该方法创建了一个适当大小的 Container 以强制 LogoWidget 缩小以适应。
以下代码中一个棘手的地方是子项看起来被指定了两次。实际上,子项的外部引用被传递给 AnimatedBuilder,AnimatedBuilder 又将其传递给匿名闭包,然后闭包将该对象用作其子项。最终结果是 AnimatedBuilder 被插入到渲染树中的两个小部件之间。
class GrowTransition extends StatelessWidget {
  const GrowTransition({
    required this.child,
    required this.animation,
    super.key,
  });

  final Widget child;
  final Animation<double> animation;

  @override
  Widget build(BuildContext context) {
    return Center(
      child: AnimatedBuilder(
        animation: animation,
        builder: (context, child) {
          return SizedBox(
            height: animation.value,
            width: animation.value,
            child: child,
          );
        },
        child: child,
      ),
    );
  }
}
最后,初始化动画的代码与 animate2 示例非常相似。initState() 方法创建一个 AnimationController 和一个 Tween,然后用 animate() 将它们绑定。魔术发生在 build() 方法中,该方法返回一个 GrowTransition 对象,其中包含一个 LogoWidget 作为子项,以及一个驱动过渡的动画对象。这些是上面项目符号列表中列出的三个元素。
void main() => runApp(const LogoApp());

class LogoWidget extends StatelessWidget {
  const LogoWidget({super.key});

  // Leave out the height and width so it fills the animating parent.
  @override
  Widget build(BuildContext context) {
    return Container(
      margin: const EdgeInsets.symmetric(vertical: 10),
      child: const FlutterLogo(),
    );
  }
}

class GrowTransition extends StatelessWidget {
  const GrowTransition({
    required this.child,
    required this.animation,
    super.key,
  });

  final Widget child;
  final Animation<double> animation;

  @override
  Widget build(BuildContext context) {
    return Center(
      child: AnimatedBuilder(
        animation: animation,
        builder: (context, child) {
          return SizedBox(
            height: animation.value,
            width: animation.value,
            child: child,
          );
        },
        child: child,
      ),
    );
  }
}

class LogoApp extends StatefulWidget {
  // ...

  @override
  Widget build(BuildContext context) => AnimatedLogo(animation: animation);
  Widget build(BuildContext context) {
    return GrowTransition(
      animation: animation,
      child: const LogoWidget(),
    );
  }

  // ...
}
应用源代码: animate4
同时动画
#在本节中,您将以上一节监控动画进度(animate3)中的示例为基础,该示例使用 AnimatedWidget 持续进出动画。考虑一种情况,您希望在不透明度从透明变为不透明的同时进行进出动画。
每个补间动画管理动画的一个方面。例如
controller = AnimationController(
  duration: const Duration(seconds: 2),
  vsync: this,
);
sizeAnimation = Tween<double>(begin: 0, end: 300).animate(controller);
opacityAnimation = Tween<double>(begin: 0.1, end: 1).animate(controller);
您可以使用 sizeAnimation.value 获取大小,并使用 opacityAnimation.value 获取不透明度,但 AnimatedWidget 的构造函数只接受一个 Animation 对象。为了解决这个问题,示例创建了自己的 Tween 对象并显式计算值。
将 AnimatedLogo 更改为封装其自己的 Tween 对象,并且其 build() 方法在父级的动画对象上调用 Tween.evaluate() 以计算所需的大小和不透明度值。以下代码突出显示了更改
class AnimatedLogo extends AnimatedWidget {
  const AnimatedLogo({super.key, required Animation<double> animation})
    : super(listenable: animation);

  // Make the Tweens static because they don't change.
  static final _opacityTween = Tween<double>(begin: 0.1, end: 1);
  static final _sizeTween = Tween<double>(begin: 0, end: 300);

  @override
  Widget build(BuildContext context) {
    final animation = listenable as Animation<double>;
    return Center(
      child: Opacity(
        opacity: _opacityTween.evaluate(animation),
        child: Container(
          margin: const EdgeInsets.symmetric(vertical: 10),
          height: _sizeTween.evaluate(animation),
          width: _sizeTween.evaluate(animation),
          child: const FlutterLogo(),
        ),
      ),
    );
  }
}

class LogoApp extends StatefulWidget {
  const LogoApp({super.key});

  @override
  State<LogoApp> createState() => _LogoAppState();
}

class _LogoAppState extends State<LogoApp> with SingleTickerProviderStateMixin {
  late Animation<double> animation;
  late AnimationController controller;

  @override
  void initState() {
    super.initState();
    controller = AnimationController(
      duration: const Duration(seconds: 2),
      vsync: this,
    );
    animation = CurvedAnimation(parent: controller, curve: Curves.easeIn)
      ..addStatusListener((status) {
        if (status == AnimationStatus.completed) {
          controller.reverse();
        } else if (status == AnimationStatus.dismissed) {
          controller.forward();
        }
      });
    controller.forward();
  }

  @override
  Widget build(BuildContext context) => AnimatedLogo(animation: animation);

  @override
  void dispose() {
    controller.dispose();
    super.dispose();
  }
}
应用源代码: animate5 对象了解动画的当前状态(例如,它是开始、停止,还是向前或向后移动),但对屏幕上显示的内容一无所知。
- 一个
AnimationController管理着Animation。 - 一个
CurvedAnimation将进度定义为非线性曲线。 - 一个
Tween在对象使用的数据范围之间进行插值。
下一步
#本教程为您使用 Tweens 在 Flutter 中创建动画奠定了基础,但还有许多其他类值得探索。您可能会研究专门的 Tween 类、特定于您的设计系统类型的动画、ReverseAnimation、共享元素过渡(也称为英雄动画)、物理模拟和 fling() 方法。