将 Flutter 模块集成到您的 iOS 项目中
Flutter UI 组件可以作为嵌入式框架逐步添加到您现有的 iOS 应用程序中。要将 Flutter 嵌入到您现有的应用程序中,请考虑以下三种方法之一。
| 嵌入方法 | 方法 | 优势 |
|---|---|---|
| 使用 CocoaPods (推荐) | 安装并使用 Flutter SDK 和 CocoaPods。每次 Xcode 构建 iOS 应用时,Flutter 都会从源代码编译 flutter_module。 | 将 Flutter 嵌入到您的应用程序中最简单的方法。 |
| 使用 iOS 框架 | 为 Flutter 组件创建 iOS 框架,将它们嵌入到您的 iOS 项目中,并更新您现有应用程序的构建设置。 | 不需要每个开发人员都在其本地计算机上安装 Flutter SDK 和 CocoaPods。 |
| 使用 iOS 框架和 CocoaPods | 将 Flutter 组件的框架嵌入到您的 iOS 应用和插件中,但将 Flutter 引擎分发为 CocoaPods podspec。 | 提供了分发大型 Flutter 引擎 (Flutter.xcframework) 库的替代方案。 |
当您将 Flutter 添加到现有的 iOS 应用时,它会增加您 iOS 应用的大小。
有关使用 UIKit 构建的应用的示例,请参阅 add_to_app 代码示例 中的 iOS 目录。有关使用 SwiftUI 的示例,请参阅 News Feed App 中的 iOS 目录。
开发系统要求
#Flutter 需要最新版本的 Xcode 和 CocoaPods。
创建 Flutter 模块
#要使用任何方法将 Flutter 嵌入到您现有的应用程序中,请先创建一个 Flutter 模块。使用以下命令创建 Flutter 模块。
cd /path/to/my_flutter
flutter create --template module my_flutter
Flutter 会在 /path/to/my_flutter/ 下创建模块项目。如果您使用CocoaPods 方法,请将模块保存在与您现有 iOS 应用相同的父目录下。
在 Flutter 模块目录中,您可以运行与在任何其他 Flutter 项目中相同的 flutter 命令,例如 flutter run 或 flutter build ios。您还可以使用 Flutter 和 Dart 插件在 VS Code 或 Android Studio/IntelliJ 中运行该模块。此项目包含一个单视图示例版本的模块,以便在将其嵌入到现有 iOS 应用之前进行测试。这有助于测试代码中仅 Flutter 部分。
组织您的模块
#my_flutter 模块的目录结构类似于典型的 Flutter 应用。
my_flutter/
├── .ios/
│   ├── Runner.xcworkspace
│   └── Flutter/podhelper.rb
├── lib/
│   └── main.dart
├── test/
└── pubspec.yaml
您的 Dart 代码应添加到 lib/ 目录。您的 Flutter 依赖项、包和插件必须添加到 pubspec.yaml 文件中。
.ios/ 隐藏的子文件夹包含一个 Xcode 工作空间,您可以在其中运行模块的独立版本。此包装器项目引导您的 Flutter 代码。它包含帮助脚本,以便在构建框架或使用 CocoaPods 将模块嵌入到现有应用程序中。
将 Flutter 模块嵌入到您的 iOS 应用中
#开发完 Flutter 模块后,您可以使用页面顶部的表格中所述的方法将其嵌入。
您可以在模拟器或真实设备上以调试模式运行,在真实设备上以发布模式运行。
使用 CocoaPods 和 Flutter SDK
#方法
#第一种方法使用 CocoaPods 来嵌入 Flutter 模块。CocoaPods 管理 Swift 项目的依赖项,包括 Flutter 代码和插件。每次 Xcode 构建应用程序时,CocoaPods 都会嵌入 Flutter 模块。
这使得您无需在 Xcode 之外运行其他命令,即可快速迭代并使用最新版本的 Flutter 模块。
要了解有关 CocoaPods 的更多信息,请参阅 CocoaPods 入门指南。
观看视频
#如果观看视频有助于您学习,此视频涵盖了将 Flutter 添加到 iOS 应用的过程
要求
#您项目中的每个开发人员都必须安装本地版本的 Flutter SDK 和 CocoaPods。
示例项目结构
#本节假设您现有的应用程序和 Flutter 模块位于同级目录中。如果您有不同的目录结构,请调整相对路径。示例目录结构如下所示
/path/to/MyApp
├── my_flutter/
│   └── .ios/
│       └── Flutter/
│         └── podhelper.rb
└── MyApp/
    └── Podfile
更新您的 Podfile
#将您的 Flutter 模块添加到您的 Podfile 配置文件中。本节假定您将 Swift 应用命名为 MyApp。
(可选)如果您的现有应用程序缺少
Podfile配置文件,请导航到您应用目录的根目录。使用pod init命令创建Podfile文件。更新您的
Podfile配置文件。在
platform声明之后添加以下几行。MyApp/Podfilerubyflutter_application_path = '../my_flutter' load File.join(flutter_application_path, '.ios', 'Flutter', 'podhelper.rb')对于每个需要嵌入 Flutter 的 Podfile 目标,请添加对
install_all_flutter_pods(flutter_application_path)方法的调用。在上一节的设置之后添加这些调用。MyApp/Podfilerubytarget 'MyApp' do install_all_flutter_pods(flutter_application_path) end在
Podfile的post_install块中,添加对flutter_post_install(installer)的调用。此块应位于Podfile配置文件中的最后一个块。MyApp/Podfilerubypost_install do |installer| flutter_post_install(installer) if defined?(flutter_post_install) end
要查看示例 Podfile,请参阅此 Flutter Podfile 示例。
嵌入您的框架
#在构建时,Xcode 会将您的 Dart 代码、每个 Flutter 插件和 Flutter 引擎打包成各自的 *.xcframework 束。CocoaPod 的 podhelper.rb 脚本随后会将这些 *.xcframework 束嵌入到您的项目中。
Flutter.xcframework包含 Flutter 引擎。App.xcframework包含此项目的已编译 Dart 代码。<plugin>.xcframework包含一个 Flutter 插件。
要将 Flutter 引擎、Dart 代码和 Flutter 插件嵌入到您的 iOS 应用中,请完成以下过程。
刷新您的 Flutter 插件。
如果在
pubspec.yaml文件中更改了 Flutter 依赖项,请在您的 Flutter 模块目录中运行flutter pub get。这将刷新podhelper.rb脚本读取的插件列表。flutter pub get使用 CocoaPods 嵌入插件和框架。
导航到您的 iOS 应用项目
/path/to/MyApp/MyApp。使用
pod install命令。pod install
您的 iOS 应用的调试和发布构建配置会嵌入相应构建模式的 Flutter 组件。
构建项目。
在 Xcode 中打开
MyApp.xcworkspace。请确保您打开的是
MyApp.xcworkspace而不是MyApp.xcodeproj。.xcworkspace文件包含 CocoaPod 依赖项,而.xcodeproj不包含。选择 Product > Build 或按 Cmd + B。
设置 LLDB 初始化文件
#生成 Flutter LLDB 文件。
- 在您的 flutter 应用程序中,运行以下命令
flutter build ios --config-only这将在
.ios/Flutter/ephemeral目录中生成 LLDB 文件。设置 LLDB 初始化文件。
转到 Product > Scheme > Edit Scheme。
在左侧边栏中选择 Run 部分。
使用您在“更新您的 Podfile”部分在 Podfile 中设置的与您的 Flutter 应用程序相同的相对路径来设置 LLDB Init File。
$(SRCROOT)/../my_flutter/.ios/Flutter/ephemeral/flutter_lldbinit如果您的方案已有一个 LLDB Init File,您可以将 Flutter 的 LLDB 文件添加到其中。Flutter 的 LLDB 初始化文件的路径必须相对于您项目 LLDB 初始化文件的位置。
例如,如果您的 LLDB 文件位于
/path/to/MyApp/.lldbinit,您可以添加以下内容command source --relative-to-command-file "../my_flutter/.ios/Flutter/ephemeral/flutter_lldbinit"
在 Xcode 中链接和嵌入框架
#方法
#在此第二种方法中,编辑您现有的 Xcode 项目,生成必要的框架,并将它们嵌入到您的应用中。Flutter 为 Flutter 本身、已编译的 Dart 代码以及每个 Flutter 插件生成 iOS 框架。嵌入这些框架并更新您现有应用程序的构建设置。
要求
#此方法不需要额外的软件或硬件要求。在以下用例中使用此方法
- 您的团队成员无法安装 Flutter SDK 和 CocoaPods
- 您不想在现有的 iOS 应用中使用 CocoaPods 作为依赖项管理器
局限性
#Flutter 无法处理与 xcframeworks 的常见依赖项。如果宿主应用和 Flutter 模块的插件都定义了相同的 pod 依赖项,并且您使用此选项集成 Flutter 模块,则会导致错误。这些错误包括 Multiple commands produce 'CommonDependency.framework' 之类的问题。
要解决此问题,请将 Flutter 模块中每个插件的 podspec 文件中的源链接到宿主应用的 Podfile。链接源而不是插件的 xcframework。下一节将介绍如何生成该框架。
为避免常见依赖项存在时发生的错误,请使用 flutter build ios-framework 并带上 --no-plugins 标志。
示例项目结构
#以下示例假设您要将框架生成到 /path/to/MyApp/Flutter/。
flutter build ios-framework --output=/path/to/MyApp/Flutter/每次更改 Flutter 模块中的代码时,都运行此命令。
生成的项目结构应类似于此目录树。
/path/to/MyApp/
└── Flutter/
    ├── Debug/
    │   ├── Flutter.xcframework
    │   ├── App.xcframework
    │   ├── FlutterPluginRegistrant.xcframework (only if you have plugins with iOS platform code)
    │   └── example_plugin.xcframework (each plugin is a separate framework)
    ├── Profile/
    │   ├── Flutter.xcframework
    │   ├── App.xcframework
    │   ├── FlutterPluginRegistrant.xcframework
    │   └── example_plugin.xcframework
    └── Release/
        ├── Flutter.xcframework
        ├── App.xcframework
        ├── FlutterPluginRegistrant.xcframework
└── example_plugin.xcframework过程
#您在 Xcode 中将生成的框架链接、嵌入或两者兼施到现有应用中的方式取决于框架的类型。
- 链接和嵌入动态框架。
- 链接静态框架。切勿嵌入它们。
Flutter 插件可能会生成静态或动态框架。链接静态框架,切勿嵌入它们。
如果您将静态框架嵌入到 iOS 应用中,则无法将该应用发布到 App Store。发布将因 Found an unexpected Mach-O header code 归档错误而失败。
链接所有框架
#要链接所需的框架,请遵循以下过程。
选择要链接的框架。
在 Project Navigator 中,单击您的项目。
单击 Build Phases 选项卡。
展开 Link Binary With Libraries。
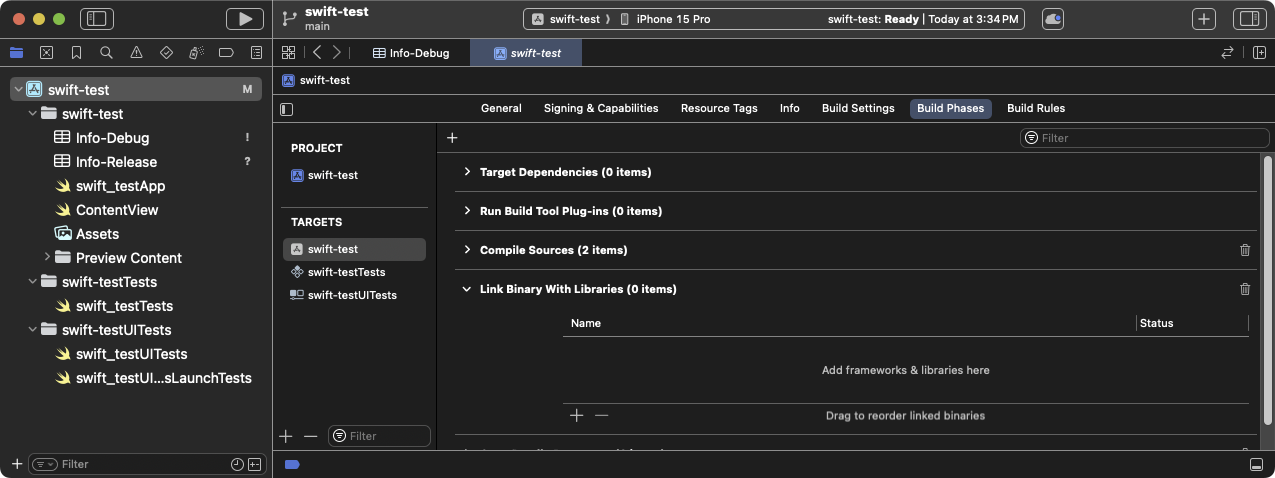
在 Xcode 中展开 Link Binary With Libraries 构建阶段 单击 + (加号)。
单击 Add Other...,然后单击 Add Files...。
从 Choose frameworks and libraries to add: 对话框中,导航到
/path/to/MyApp/Flutter/Release/目录。按住 Command 键并单击该目录中的框架,然后单击 Open。
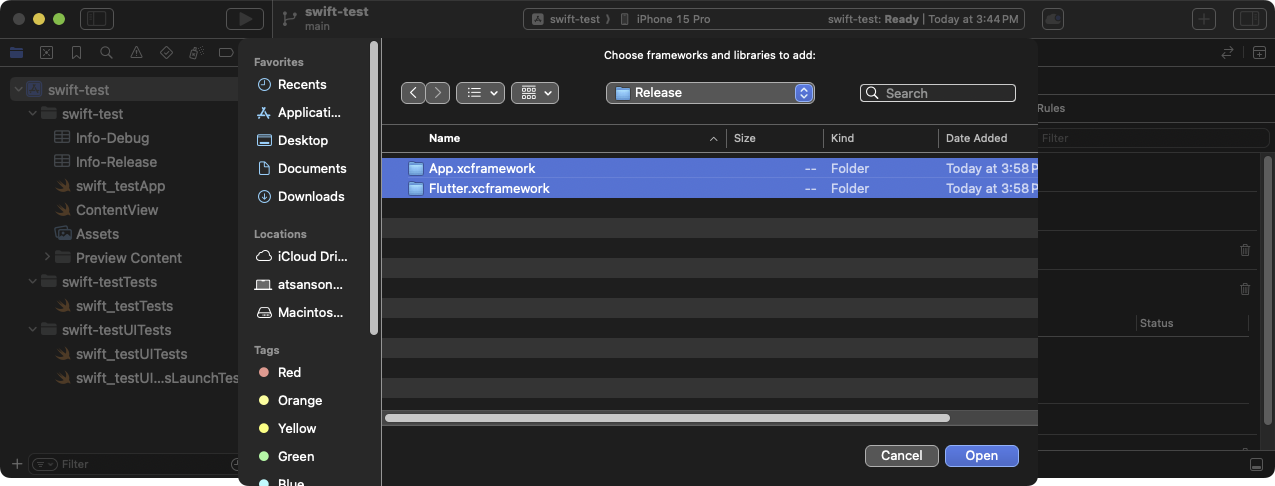
在 Xcode 的 Choose frameworks and libraries to add: 对话框中选择要链接的框架
更新库的路径以适应构建模式。
启动 Finder。
导航到
/path/to/MyApp/目录。右键单击
MyApp.xcodeproj并选择 Show Package Contents。使用 Xcode 打开
project.pbxproj。该文件会在 Xcode 的文本编辑器中打开。您关闭文本编辑器之前,这也会锁定 Project Navigator。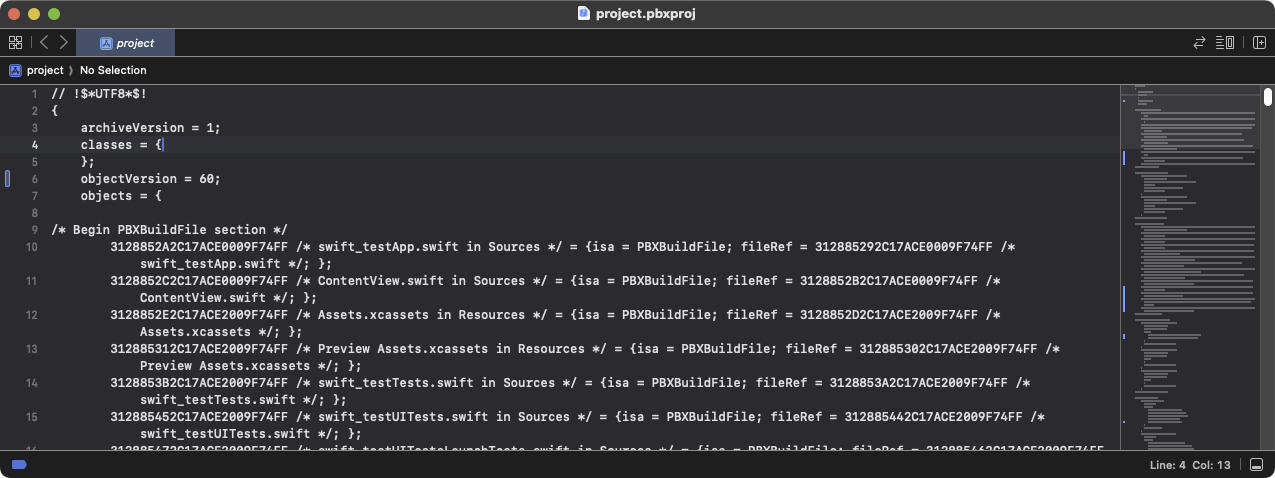
project-pbxproj文件在 Xcode 文本编辑器中打开在
/* Begin PBXFileReference section */中找到与以下文本相似的行。text312885572C1A441C009F74FF /* Flutter.xcframework */ = { isa = PBXFileReference; expectedSignature = "AppleDeveloperProgram:S8QB4VV633:FLUTTER.IO LLC"; lastKnownFileType = wrapper.xcframework; name = Flutter.xcframework; path = Flutter/Release/Flutter.xcframework; sourceTree = "<group>"; }; 312885582C1A441C009F74FF /* App.xcframework */ = { isa = PBXFileReference; lastKnownFileType = wrapper.xcframework; name = App.xcframework; path = Flutter/Release/App.xcframework; sourceTree = "<group>"; };更改上一步中突出显示的
Release文本,将其更改为$(CONFIGURATION)。同时将路径用引号括起来。text312885572C1A441C009F74FF /* Flutter.xcframework */ = { isa = PBXFileReference; expectedSignature = "AppleDeveloperProgram:S8QB4VV633:FLUTTER.IO LLC"; lastKnownFileType = wrapper.xcframework; name = Flutter.xcframework; path = "Flutter/$(CONFIGURATION)/Flutter.xcframework"; sourceTree = "<group>"; }; 312885582C1A441C009F74FF /* App.xcframework */ = { isa = PBXFileReference; lastKnownFileType = wrapper.xcframework; name = App.xcframework; path = "Flutter/$(CONFIGURATION)/App.xcframework"; sourceTree = "<group>"; };
更新搜索路径。
单击 Build Settings 选项卡。
导航到 Search Paths
双击 Framework Search Paths 右侧的区域。
在组合框中,单击 + (加号)。
键入
$(inherited)。然后按 Enter。单击 + (加号)。
键入
$(PROJECT_DIR)/Flutter/$(CONFIGURATION)/,然后按 Enter。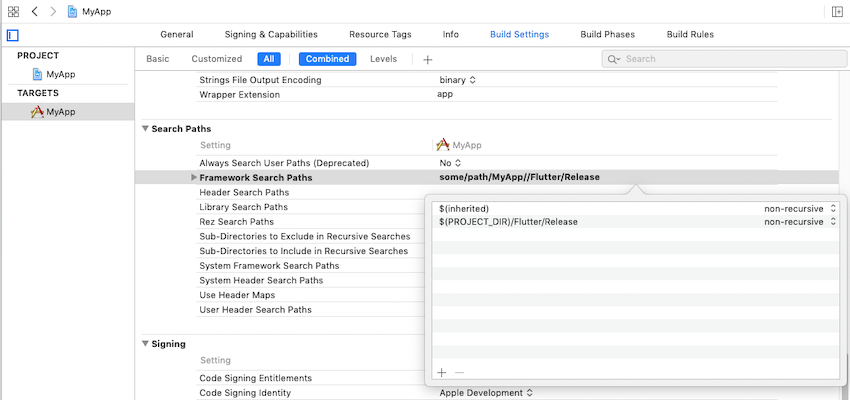
在 Xcode 中更新 Framework Search Paths
链接框架后,它们应显示在目标 General 设置的 Frameworks, Libraries, and Embedded Content 部分。
嵌入动态框架
#要嵌入动态框架,请完成以下过程。
导航到 General > Frameworks, Libraries, and Embedded Content。
单击每个动态框架,然后选择 Embed & Sign。
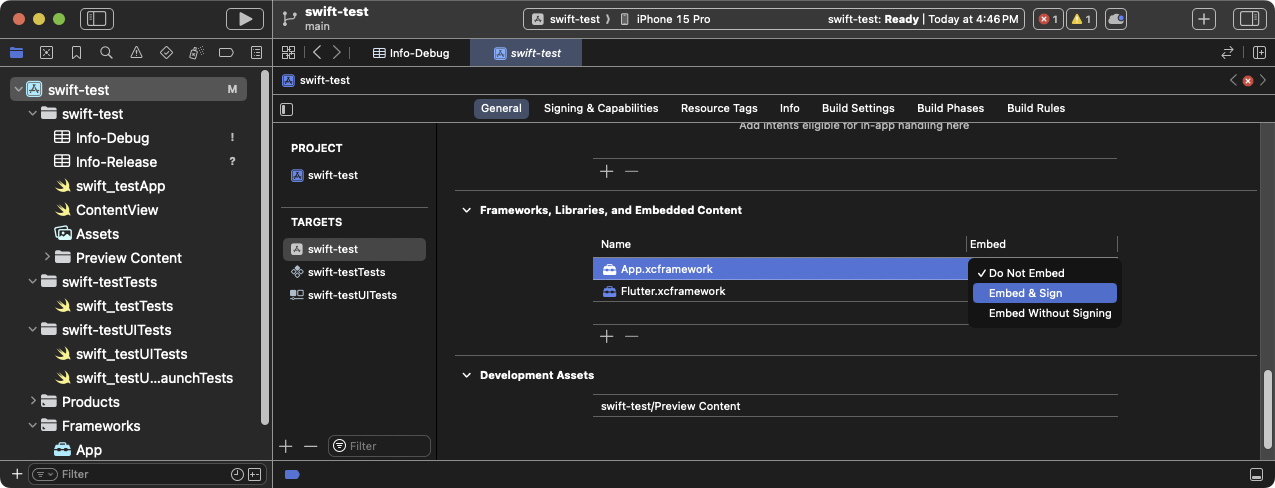
在 Xcode 中为每个框架选择 Embed & Sign 不要包含任何静态框架,包括
FlutterPluginRegistrant.xcframework。单击 Build Phases 选项卡。
展开 Embed Frameworks。您的动态框架应在该部分显示。
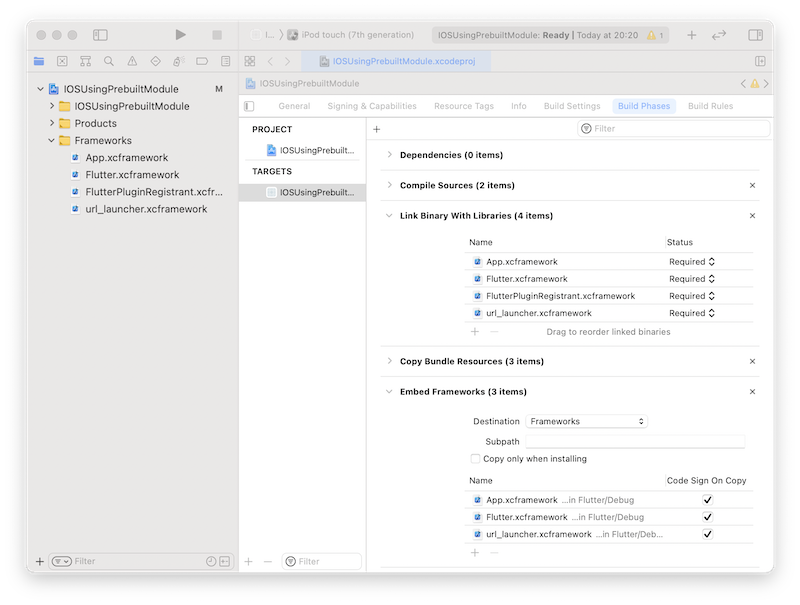
Xcode 中展开的 Embed Frameworks 构建阶段 构建项目。
在 Xcode 中打开
MyApp.xcworkspace。请确保您打开的是
MyApp.xcworkspace而不是MyApp.xcodeproj。.xcworkspace文件包含 CocoaPod 依赖项,而.xcodeproj不包含。选择 Product > Build 或按 Cmd + B。
设置 LLDB 初始化文件
#生成 Flutter LLDB 文件。
- 在您的 flutter 应用程序中,如果尚未运行,请重新运行
flutter build ios-framework
flutter build ios-framework --output=/path/to/MyApp/Flutter/这将生成
/path/to/MyApp/Flutter/目录中的 LLDB 文件。- 在您的 flutter 应用程序中,如果尚未运行,请重新运行
设置 LLDB 初始化文件。
转到 Product > Scheme > Edit Scheme。
在左侧边栏中选择 Run 部分。
将 LLDB Init File 设置为以下内容
$(PROJECT_DIR)/Flutter/flutter_lldbinit如果您的方案已有一个 LLDB Init File,您可以将 Flutter 的 LLDB 文件添加到其中。Flutter 的 LLDB 初始化文件的路径必须相对于您项目 LLDB 初始化文件的位置。
例如,如果您的 LLDB 文件位于
/path/to/MyApp/.lldbinit,您可以添加以下内容command source --relative-to-command-file "Flutter/flutter_lldbinit"
在 Xcode 中使用框架和 Flutter 框架作为 podspec
#方法
#此方法将 Flutter 生成为 CocoaPods podspec,而不是将大型 Flutter.xcframework 分发给其他开发人员、机器或持续集成系统。Flutter 仍然为已编译的 Dart 代码以及每个 Flutter 插件生成 iOS 框架。嵌入这些框架并更新您现有应用程序的构建设置。
要求
#此方法不需要额外的软件或硬件要求。在以下用例中使用此方法
- 您的团队成员无法安装 Flutter SDK 和 CocoaPods
- 您不想在现有的 iOS 应用中使用 CocoaPods 作为依赖项管理器
局限性
#Flutter 无法处理与 xcframeworks 的常见依赖项。如果宿主应用和 Flutter 模块的插件都定义了相同的 pod 依赖项,并且您使用此选项集成 Flutter 模块,则会导致错误。这些错误包括 Multiple commands produce 'CommonDependency.framework' 之类的问题。
要解决此问题,请将 Flutter 模块中每个插件的 podspec 文件中的源链接到宿主应用的 Podfile。链接源而不是插件的 xcframework。下一节将介绍如何生成该框架。
为避免常见依赖项存在时发生的错误,请使用 flutter build ios-framework 并带上 --no-plugins 标志。
此方法仅适用于 beta 或 stable 发布频道。
示例项目结构
#以下示例假设您要将框架生成到 /path/to/MyApp/Flutter/。
flutter build ios-framework --output=/path/to/MyApp/Flutter/每次更改 Flutter 模块中的代码时,都运行此命令。
生成的项目结构应类似于此目录树。
/path/to/MyApp/
└── Flutter/
    ├── Debug/
    │   ├── Flutter.xcframework
    │   ├── App.xcframework
    │   ├── FlutterPluginRegistrant.xcframework (only if you have plugins with iOS platform code)
    │   └── example_plugin.xcframework (each plugin is a separate framework)
    ├── Profile/
    │   ├── Flutter.xcframework
    │   ├── App.xcframework
    │   ├── FlutterPluginRegistrant.xcframework
    │   └── example_plugin.xcframework
    └── Release/
        ├── Flutter.xcframework
        ├── App.xcframework
        ├── FlutterPluginRegistrant.xcframework
└── example_plugin.xcframework将 Flutter 引擎添加到您的 Podfile
#使用 CocoaPods 的宿主应用可以将其 Flutter 引擎添加到其 Podfile 中。
pod 'Flutter', :podspec => '/path/to/MyApp/Flutter/[build mode]/Flutter.podspec'链接和嵌入应用及插件框架
#Flutter 插件可能会生成静态或动态框架。链接静态框架,切勿嵌入它们。
如果您将静态框架嵌入到 iOS 应用中,则无法将该应用发布到 App Store。发布将因 Found an unexpected Mach-O header code 归档错误而失败。
链接所有框架
#要链接所需的框架,请遵循以下过程。
选择要链接的框架。
在 Project Navigator 中,单击您的项目。
单击 Build Phases 选项卡。
展开 Link Binary With Libraries。

在 Xcode 中展开 Link Binary With Libraries 构建阶段 单击 + (加号)。
单击 Add Other...,然后单击 Add Files...。
从 Choose frameworks and libraries to add: 对话框中,导航到
/path/to/MyApp/Flutter/Release/目录。按住 Command 键并单击该目录中的框架,然后单击 Open。

在 Xcode 的 Choose frameworks and libraries to add: 对话框中选择要链接的框架
更新库的路径以适应构建模式。
启动 Finder。
导航到
/path/to/MyApp/目录。右键单击
MyApp.xcodeproj并选择 Show Package Contents。使用 Xcode 打开
project.pbxproj。该文件会在 Xcode 的文本编辑器中打开。您关闭文本编辑器之前,这也会锁定 Project Navigator。
project-pbxproj文件在 Xcode 文本编辑器中打开在
/* Begin PBXFileReference section */中找到与以下文本相似的行。text312885572C1A441C009F74FF /* Flutter.xcframework */ = { isa = PBXFileReference; expectedSignature = "AppleDeveloperProgram:S8QB4VV633:FLUTTER.IO LLC"; lastKnownFileType = wrapper.xcframework; name = Flutter.xcframework; path = Flutter/Release/Flutter.xcframework; sourceTree = "<group>"; }; 312885582C1A441C009F74FF /* App.xcframework */ = { isa = PBXFileReference; lastKnownFileType = wrapper.xcframework; name = App.xcframework; path = Flutter/Release/App.xcframework; sourceTree = "<group>"; };更改上一步中突出显示的
Release文本,将其更改为$(CONFIGURATION)。同时将路径用引号括起来。text312885572C1A441C009F74FF /* Flutter.xcframework */ = { isa = PBXFileReference; expectedSignature = "AppleDeveloperProgram:S8QB4VV633:FLUTTER.IO LLC"; lastKnownFileType = wrapper.xcframework; name = Flutter.xcframework; path = "Flutter/$(CONFIGURATION)/Flutter.xcframework"; sourceTree = "<group>"; }; 312885582C1A441C009F74FF /* App.xcframework */ = { isa = PBXFileReference; lastKnownFileType = wrapper.xcframework; name = App.xcframework; path = "Flutter/$(CONFIGURATION)/App.xcframework"; sourceTree = "<group>"; };
更新搜索路径。
单击 Build Settings 选项卡。
导航到 Search Paths
双击 Framework Search Paths 右侧的区域。
在组合框中,单击 + (加号)。
键入
$(inherited)。然后按 Enter。单击 + (加号)。
键入
$(PROJECT_DIR)/Flutter/$(CONFIGURATION)/,然后按 Enter。
在 Xcode 中更新 Framework Search Paths
链接框架后,它们应显示在目标 General 设置的 Frameworks, Libraries, and Embedded Content 部分。
嵌入动态框架
#要嵌入动态框架,请完成以下过程。
导航到 General > Frameworks, Libraries, and Embedded Content。
单击每个动态框架,然后选择 Embed & Sign。

在 Xcode 中为每个框架选择 Embed & Sign 不要包含任何静态框架,包括
FlutterPluginRegistrant.xcframework。单击 Build Phases 选项卡。
展开 Embed Frameworks。您的动态框架应在该部分显示。

Xcode 中展开的 Embed Frameworks 构建阶段 构建项目。
在 Xcode 中打开
MyApp.xcworkspace。请确保您打开的是
MyApp.xcworkspace而不是MyApp.xcodeproj。.xcworkspace文件包含 CocoaPod 依赖项,而.xcodeproj不包含。选择 Product > Build 或按 Cmd + B。
设置 LLDB 初始化文件
#生成 Flutter LLDB 文件。
- 在您的 flutter 应用程序中,如果尚未运行,请重新运行
flutter build ios-framework
flutter build ios-framework --output=/path/to/MyApp/Flutter/这将生成
/path/to/MyApp/Flutter/目录中的 LLDB 文件。- 在您的 flutter 应用程序中,如果尚未运行,请重新运行
设置 LLDB 初始化文件。
转到 Product > Scheme > Edit Scheme。
在左侧边栏中选择 Run 部分。
将 LLDB Init File 设置为以下内容
$(PROJECT_DIR)/Flutter/flutter_lldbinit如果您的方案已有一个 LLDB Init File,您可以将 Flutter 的 LLDB 文件添加到其中。Flutter 的 LLDB 初始化文件的路径必须相对于您项目 LLDB 初始化文件的位置。
例如,如果您的 LLDB 文件位于
/path/to/MyApp/.lldbinit,您可以添加以下内容command source --relative-to-command-file "Flutter/flutter_lldbinit"
设置本地网络隐私权限
#在 iOS 14 及更高版本上,在 iOS 应用的调试版本中启用 Dart 多播 DNS 服务。这会添加调试功能,例如热重载和 DevTools,通过 flutter attach 实现。
要仅在调试版本中设置本地网络隐私权限,请为每个构建配置创建一个单独的 Info.plist。SwiftUI 项目启动时没有 Info.plist 文件。如果需要创建属性列表,可以通过 Xcode 或文本编辑器进行。以下说明假定使用默认的调试和发布配置。根据您应用的构建配置,按需调整名称。
创建新的属性列表。
在 Xcode 中打开您的项目。
在 Project Navigator 中,单击项目名称。
在 Editor 面板的 Targets 列表中,单击您的应用。
单击 Info 选项卡。
展开 Custom iOS Target Properties。
右键单击列表并选择 Add Row。
从下拉菜单中选择 Bonjour Services。这会在项目目录中创建一个名为
Info的新属性列表。在 Finder 中显示为Info.plist。
将
Info.plist重命名为Info-Debug.plist在左侧的项目列表中单击 Info 文件。
在右侧的 Identity and Type 面板中,将 Name 从
Info.plist更改为Info-Debug.plist。
创建发布属性列表。
在 Project Navigator 中,单击
Info-Debug.plist。选择 File > Duplicate...。
您也可以按 Cmd + Shift + S。在对话框中,将 Save As: 字段设置为
Info-Release.plist,然后单击 Save。
向调试属性列表添加必要的属性。
在 Project Navigator 中,单击
Info-Debug.plist。将字符串值
_dartVmService._tcp添加到 Bonjour Services 数组。(可选)要设置您想要的自定义权限对话框文本,请添加 Privacy - Local Network Usage Description 键。
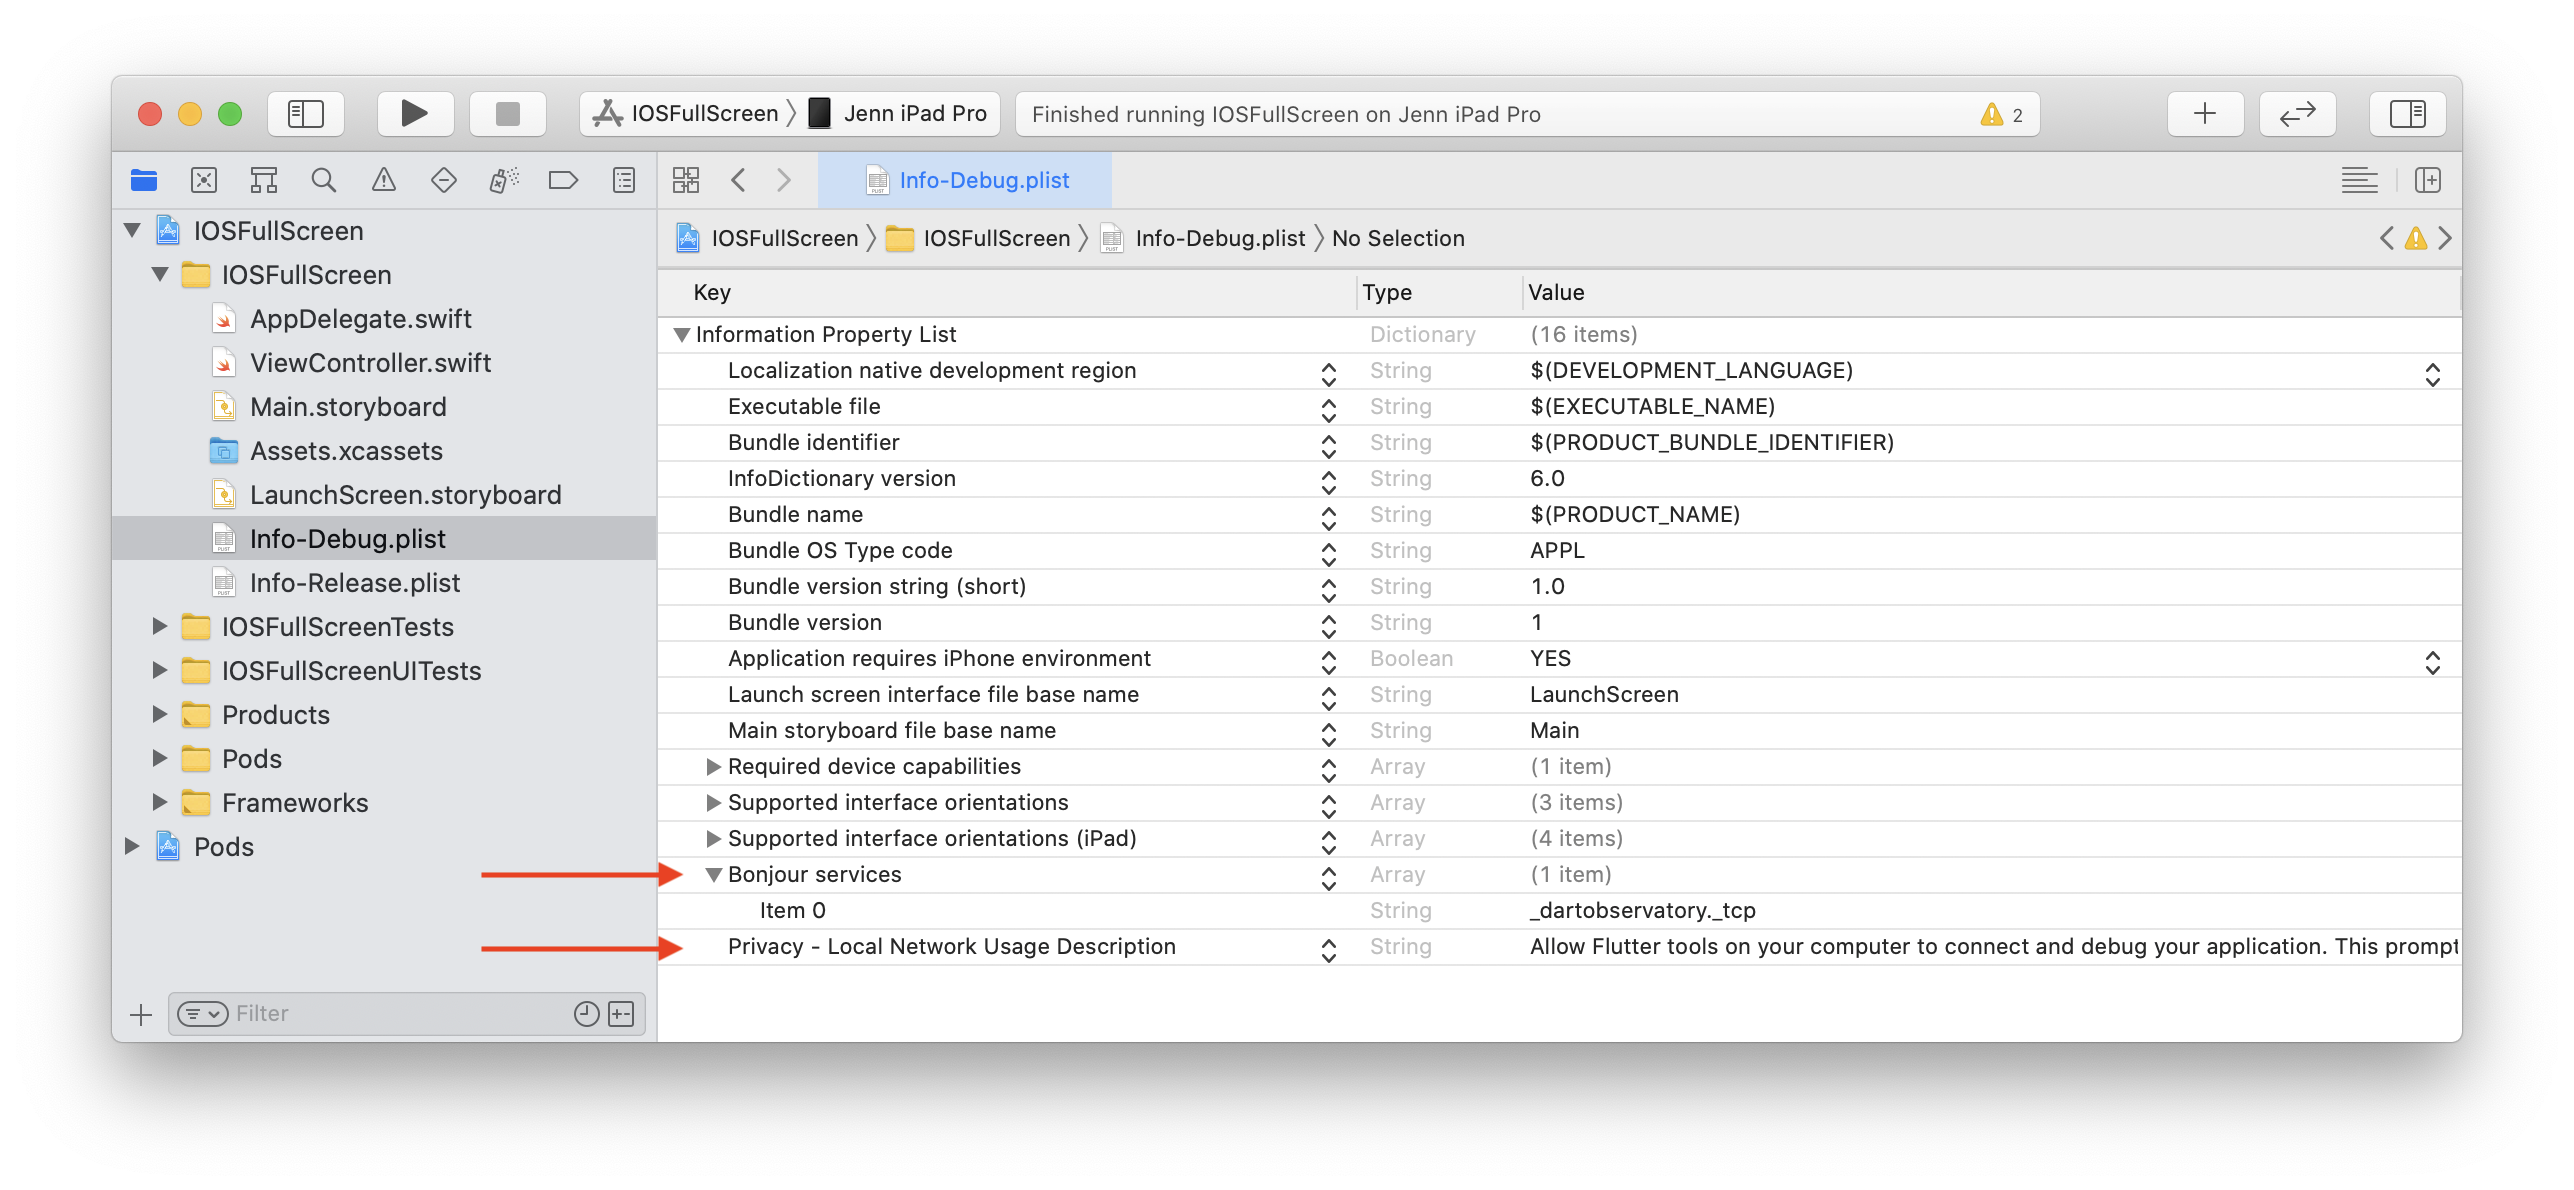
添加了 Bonjour Services 和 Privacy - Local Network Usage Description 键的 Info-Debug属性列表
设置目标以使用不同构建模式的不同属性列表。
在 Project Navigator 中,单击您的项目。
单击 Build Settings 选项卡。
单击 All 和 Combined 子选项卡。
在 Search 框中,键入
plist。
这将搜索结果限制为包含属性列表的设置。滚动列表直到看到 Packaging。
单击 Info.plist File 设置。
将 Info.plist File 的值从
path/to/Info.plist更改为path/to/Info-$(CONFIGURATION).plist。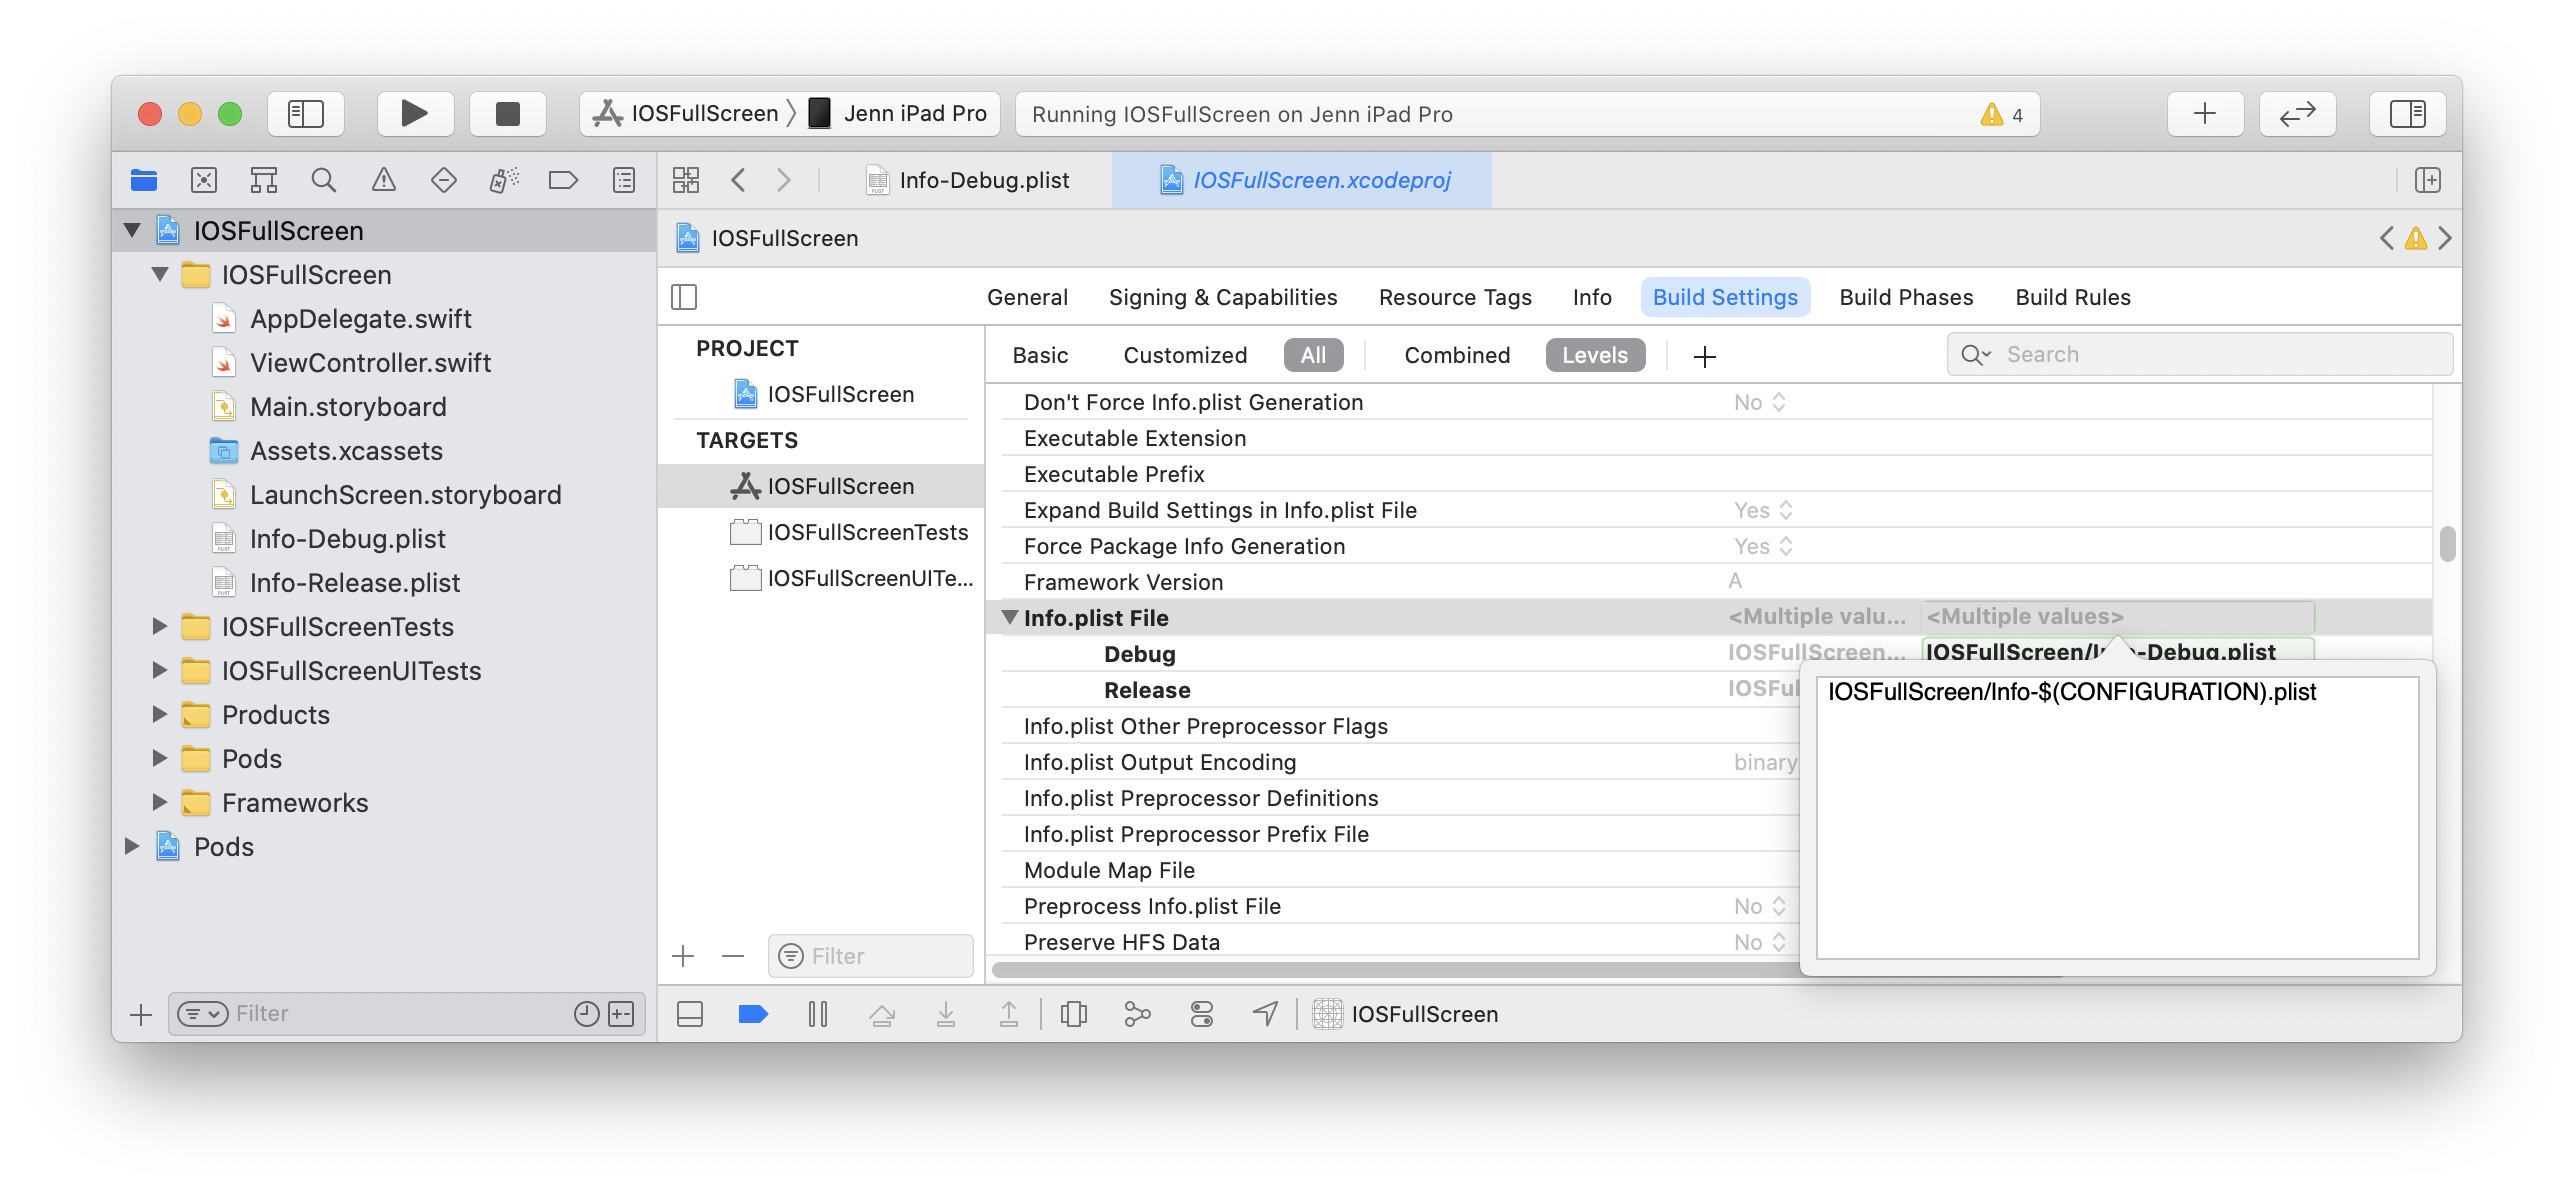
更新 Info.plist构建设置以使用特定于构建模式的属性列表这会在调试模式下解析为路径 Info-Debug.plist,在发布模式下解析为 Info-Release.plist。
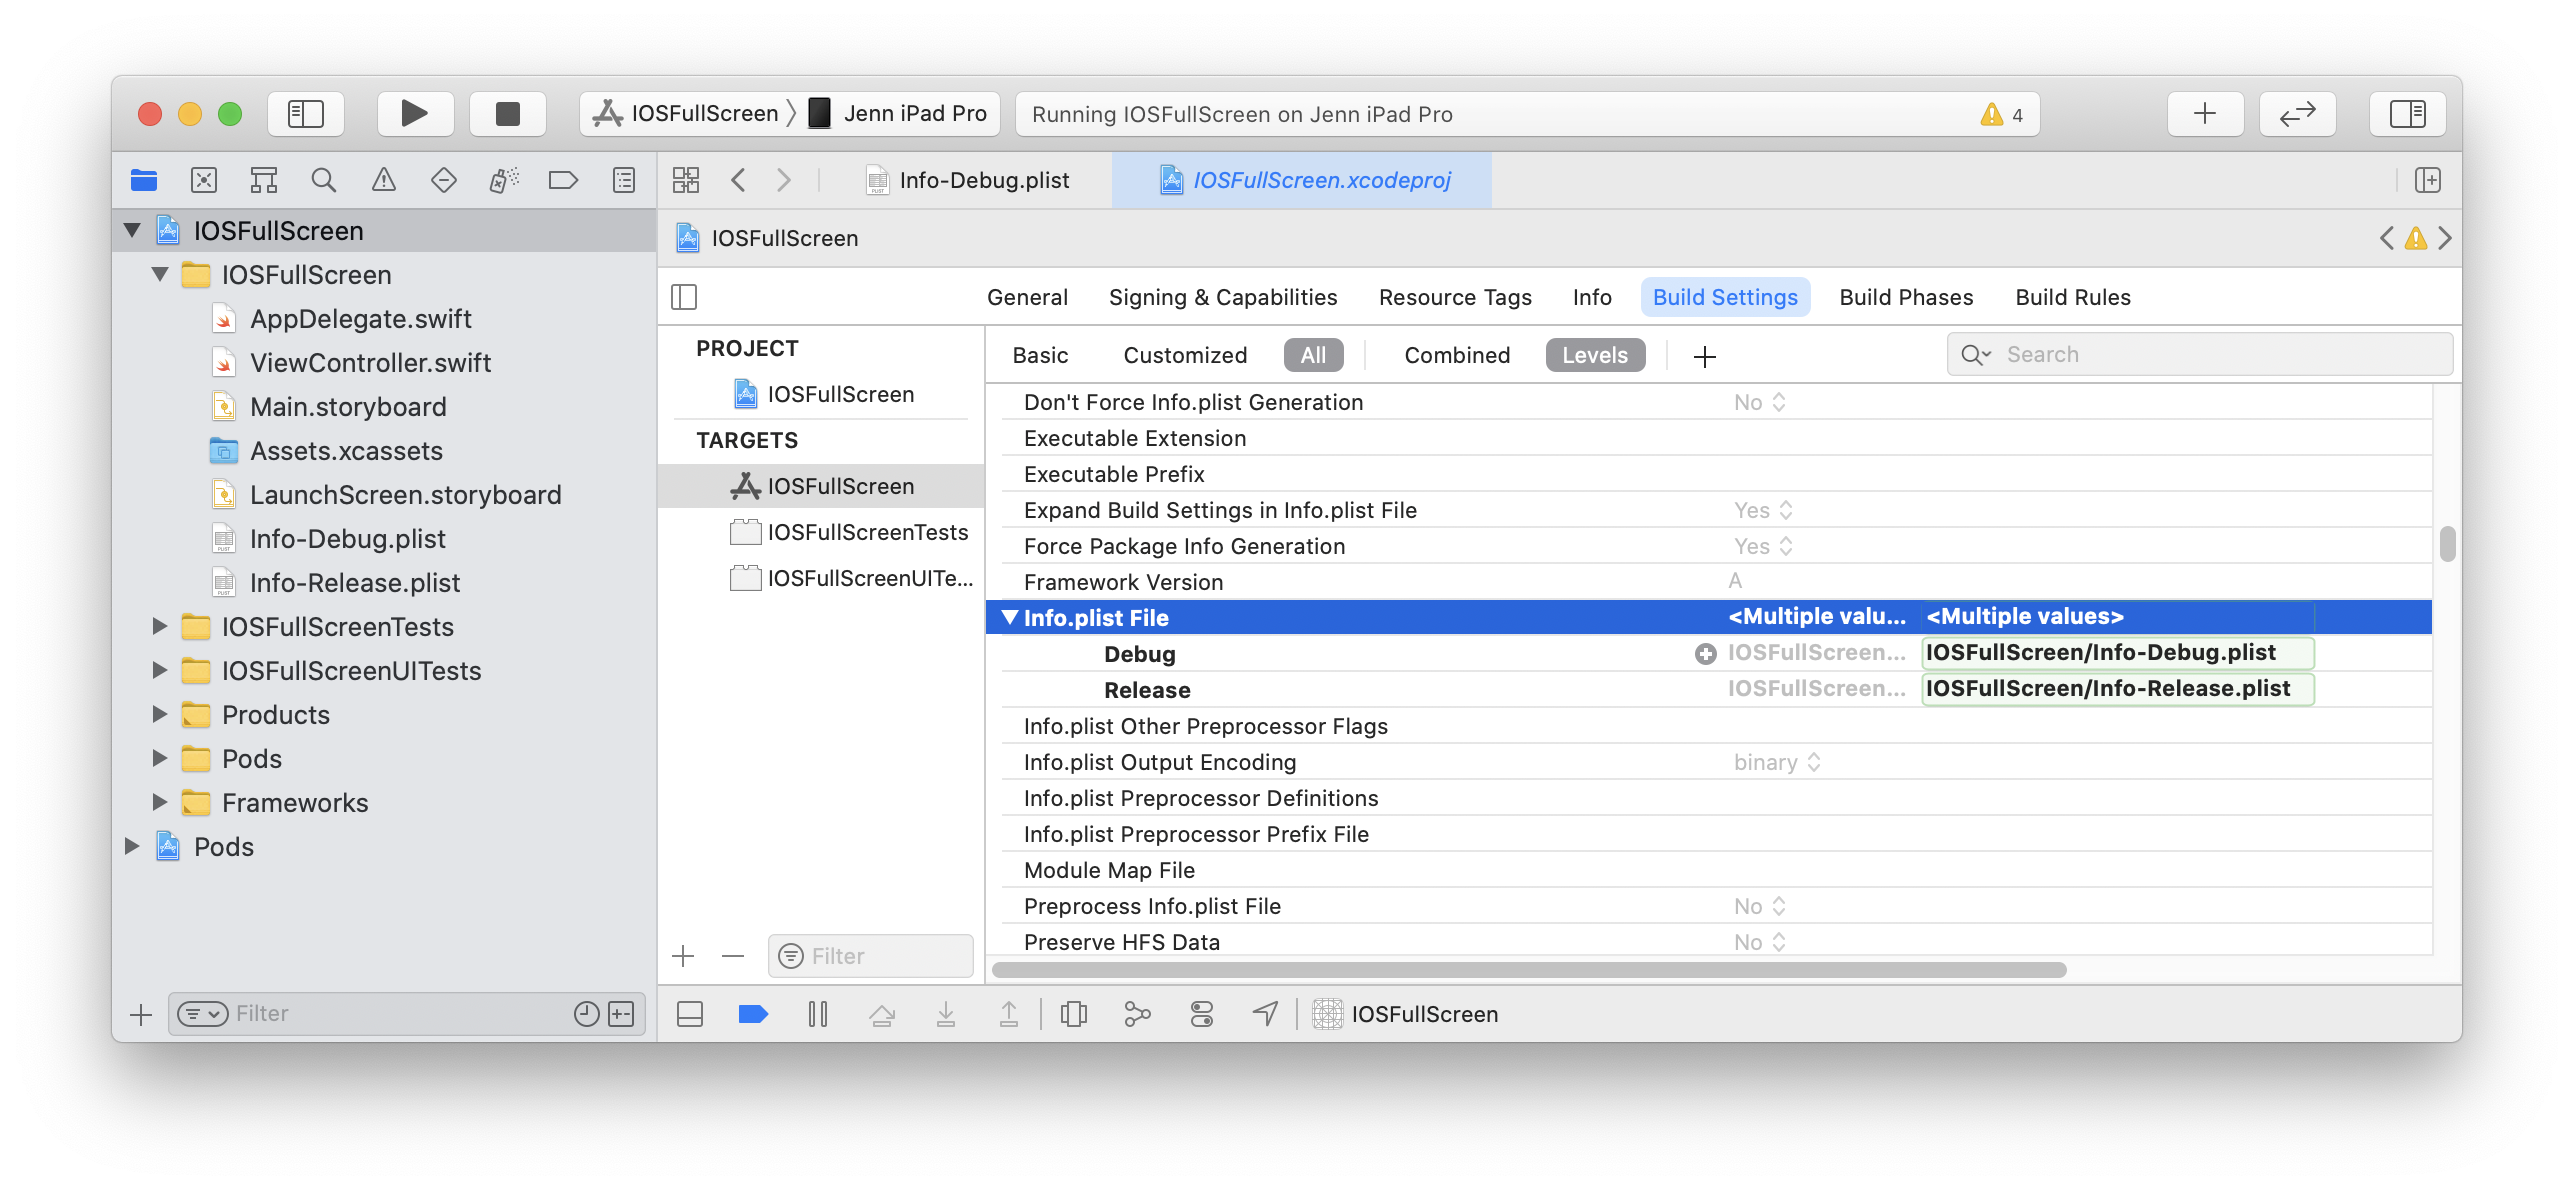
显示配置变化的已更新 Info.plist File 构建设置
从构建阶段中移除发布属性列表。
在 Project Navigator 中,单击您的项目。
单击 Build Phases 选项卡。
展开 Copy Bundle Resources。
如果此列表中包含
Info-Release.plist,请单击它,然后单击其下方的 - (减号) 从资源列表中移除该属性列表。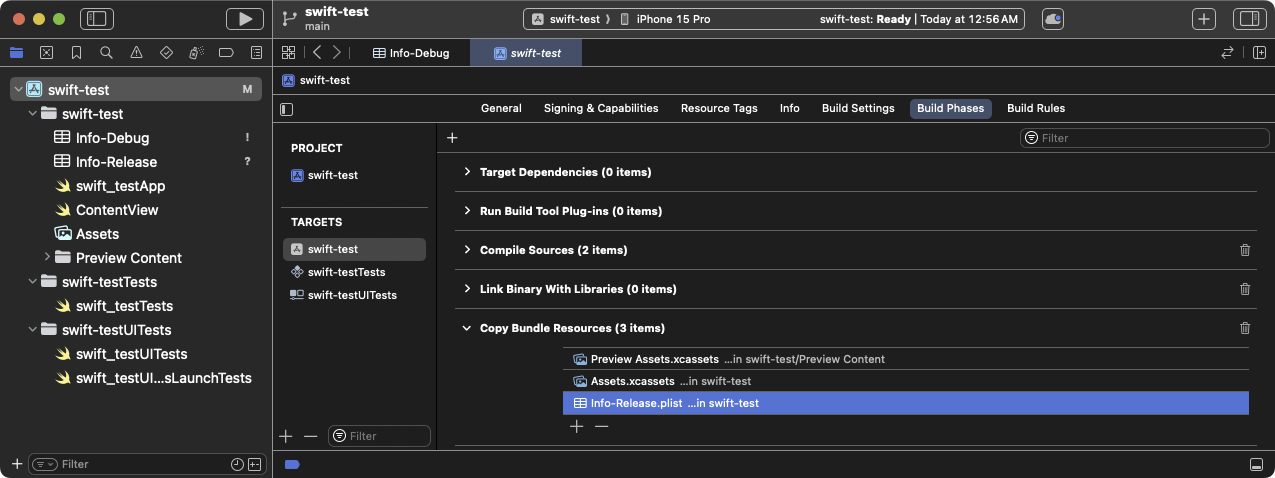
Copy Bundle 构建阶段显示 Info-Release.plist 设置。删除此设置。
您调试应用的第一个 Flutter 屏幕会提示本地网络权限。
单击 OK。
(可选)要在应用加载前授予权限,请在 Settings > Privacy > Local Network > Your App 中启用。
缓解 Apple Silicon Mac 的已知问题
#在运行 Apple Silicon 的 Mac 上,宿主应用会为 arm64 模拟器构建。虽然 Flutter 支持 arm64 模拟器,但某些插件可能不支持。如果您使用其中一个插件,您可能会看到类似 Undefined symbols for architecture arm64 的编译错误。如果发生这种情况,请从宿主应用的模拟器架构中排除 arm64。
在 Project Navigator 中,单击您的项目。
单击 Build Settings 选项卡。
单击 All 和 Combined 子选项卡。
在 Architectures 下,单击 Excluded Architectures。
展开以查看可用的构建配置。
单击 Debug。
单击 + (加号)。
选择 iOS Simulator。
双击 Any iOS Simulator SDK 的值列。
单击 + (加号)。
在 Debug > Any iOS Simulator SDK 对话框中键入
arm64。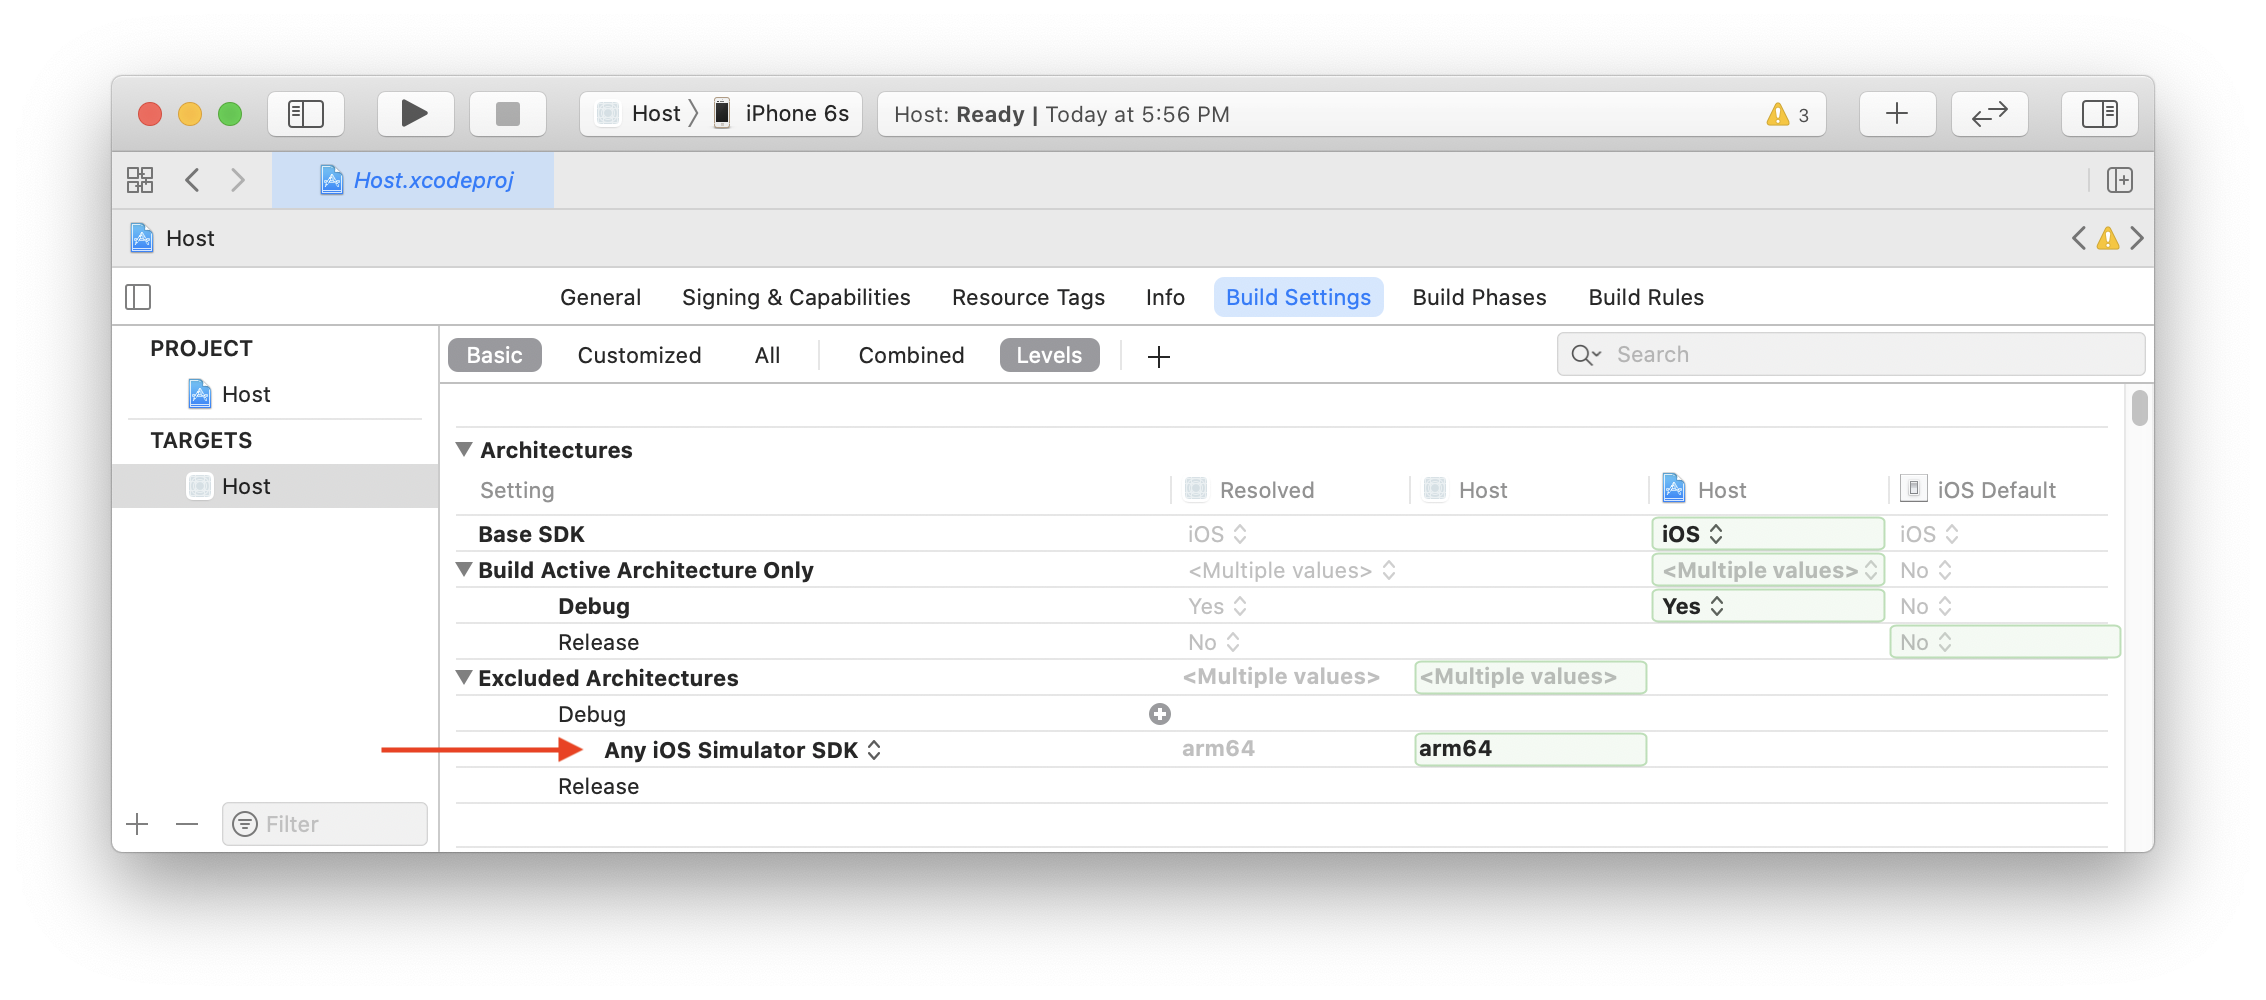
将 arm64添加为应用的排除架构按 Esc 关闭此对话框。
对发布构建模式重复这些步骤。
对任何 iOS 单元测试目标重复。
下一步
#您现在可以将 Flutter 屏幕添加到您现有的 iOS 应用中。